


10 Creative Ways to Display Photos and Transform Your Home
Your camera roll is a treasure trove of captured memories, from sun-drenched vacations and landmark celebrations to the quiet, everyday moments that define a life. Too often, these precious images remain locked away on a device, rarely seen or appreciated. This guide is designed to change that, offering a comprehensive look at creative ways to display photos that transform them from digital files into tangible, personal art for your home. We move beyond the standard picture frame to explore dynamic, modern, and heartfelt methods for showcasing your favorite snapshots.
Throughout this list, you'll discover actionable ideas tailored for every space, style, and budget. We will detail everything from constructing a narrative-driven gallery wall that tells your family’s story to creating cozy, functional décor like a custom photo blanket that turns a cherished memory into a source of comfort. For those in rented spaces, finding creative yet non-damaging ways to personalize your home is key. Explore various renter-friendly wall decor solutions that allow for personalization without permanence.
Whether you're looking to create a stunning focal point in your living room, add a personal touch to a nursery, or find the perfect, meaningful gift for the holidays, you’ll find practical inspiration here. Prepare to unlock the potential of your photo library and surround yourself with the moments that matter most, turning your house into a home that is uniquely and beautifully yours.
1. The Modern Gallery Wall: A Personal Story on Display
A gallery wall transforms a blank space into a dynamic, personal narrative. This method involves curating a collection of framed photographs and art, arranging them together to create a cohesive and impactful focal point. It’s one of the most popular creative ways to display photos because it acts as a visual diary, showcasing your family's growth, travels, and milestones in a single, powerful installation.
Best For and Key Benefits
This approach is perfect for making a statement in a living room, hallway, or up a staircase. A well-executed gallery wall adds personality and warmth, turning an ordinary wall into a conversation starter. It allows you to combine different memories, from casual snapshots to professional portraits, into one harmonious display. The versatility of a gallery wall means it can grow and evolve with your family; you can easily swap out photos or add new frames over time.
How to Style Your Gallery Wall
Creating a stunning gallery wall is all about planning and precision.
- Plan Your Layout: Before hammering any nails, lay all your frames on the floor. Arrange them until you find a composition you love, whether it's a structured grid or a more organic, salon-style cluster.
- Maintain Spacing: Use a consistent gap between frames, typically 2-3 inches, to create a clean, intentional look. You can use paper cutouts of your frames, taping them to the wall to visualize placement and spacing.
- Mix It Up: Don't be afraid to mix frame colors, materials, and sizes. Combining sleek black frames with warm wood tones or ornate metallic ones can add texture and visual interest. For more detailed guidance, your guide to a pictures wall collage offers excellent tips on blending different elements.
Pro Tip: For a truly unique touch, anchor your gallery wall with a central, non-traditional piece. A custom photo blanket, draped over a nearby armchair or hung as a soft tapestry, can complement the framed prints and add a cozy, tactile dimension to your display. This is a beautiful way to feature a favorite image, such as a wedding photo or family portrait, in a larger format. For more ideas on showcasing these special moments, explore different ways to display wedding photos in your home.
2. Photo Books and Coffee Table Books
Photo books offer a tangible, narrative-driven way to experience your most cherished memories. This method involves curating a collection of images and arranging them in a professionally bound book, transforming digital files into a story you can hold and share. Unlike a single framed print, a photo book allows you to present a complete story, from a year in review to a special vacation, making it one of the most personal and creative ways to display photos.
Best For and Key Benefits
This approach is perfect for commemorating significant events like weddings, anniversaries, or the first year of a baby's life. Photo books are meant to be handled and explored, making them an engaging addition to a coffee table, bookshelf, or guest room. They invite interaction and allow visitors to connect with your stories on a deeper level. The format is also ideal for gifting, as it creates a beautiful, lasting keepsake that can be shared with family and friends.
How to Style Your Photo Book
Creating an impactful photo book is about telling a compelling visual story.
- Choose a Clear Theme: Start with a specific narrative, such as "Our European Adventure" or "The First Five Years." A strong theme will guide your photo selection and layout decisions, creating a cohesive final product.
- Maintain Visual Consistency: Use a consistent editing style or filter throughout the book. This creates a professional, polished look that ties disparate images together, whether they were taken on a phone or a professional camera.
- Add Context with Text: Don't forget to include captions, dates, or short anecdotes. These details enrich the viewing experience, providing context and preserving the stories behind the images for years to come.
Pro Tip: Elevate your coffee table display by pairing your photo book with a complementary custom photo blanket. Drape a blanket featuring the book's "cover photo" over a nearby sofa or chair. This creates a cohesive, multi-sensory experience, inviting guests to flip through your memories while wrapped in a cozy, personalized throw. This pairing makes a particularly thoughtful and impressive gift, combining a narrative keepsake with a functional piece of art. To discover more unique presents, explore these photo gift ideas for an anniversary.
3. Digital Photo Frames: A Living Album on Your Sideboard
Digital photo frames offer a dynamic, ever-changing way to showcase your favorite memories. Instead of a single static image, these electronic displays cycle through an entire collection of digital photos, turning any tabletop or shelf into a living album. This modern approach is one of the most creative ways to display photos because it allows you to enjoy thousands of images in one compact, elegant frame that can be updated instantly from anywhere.
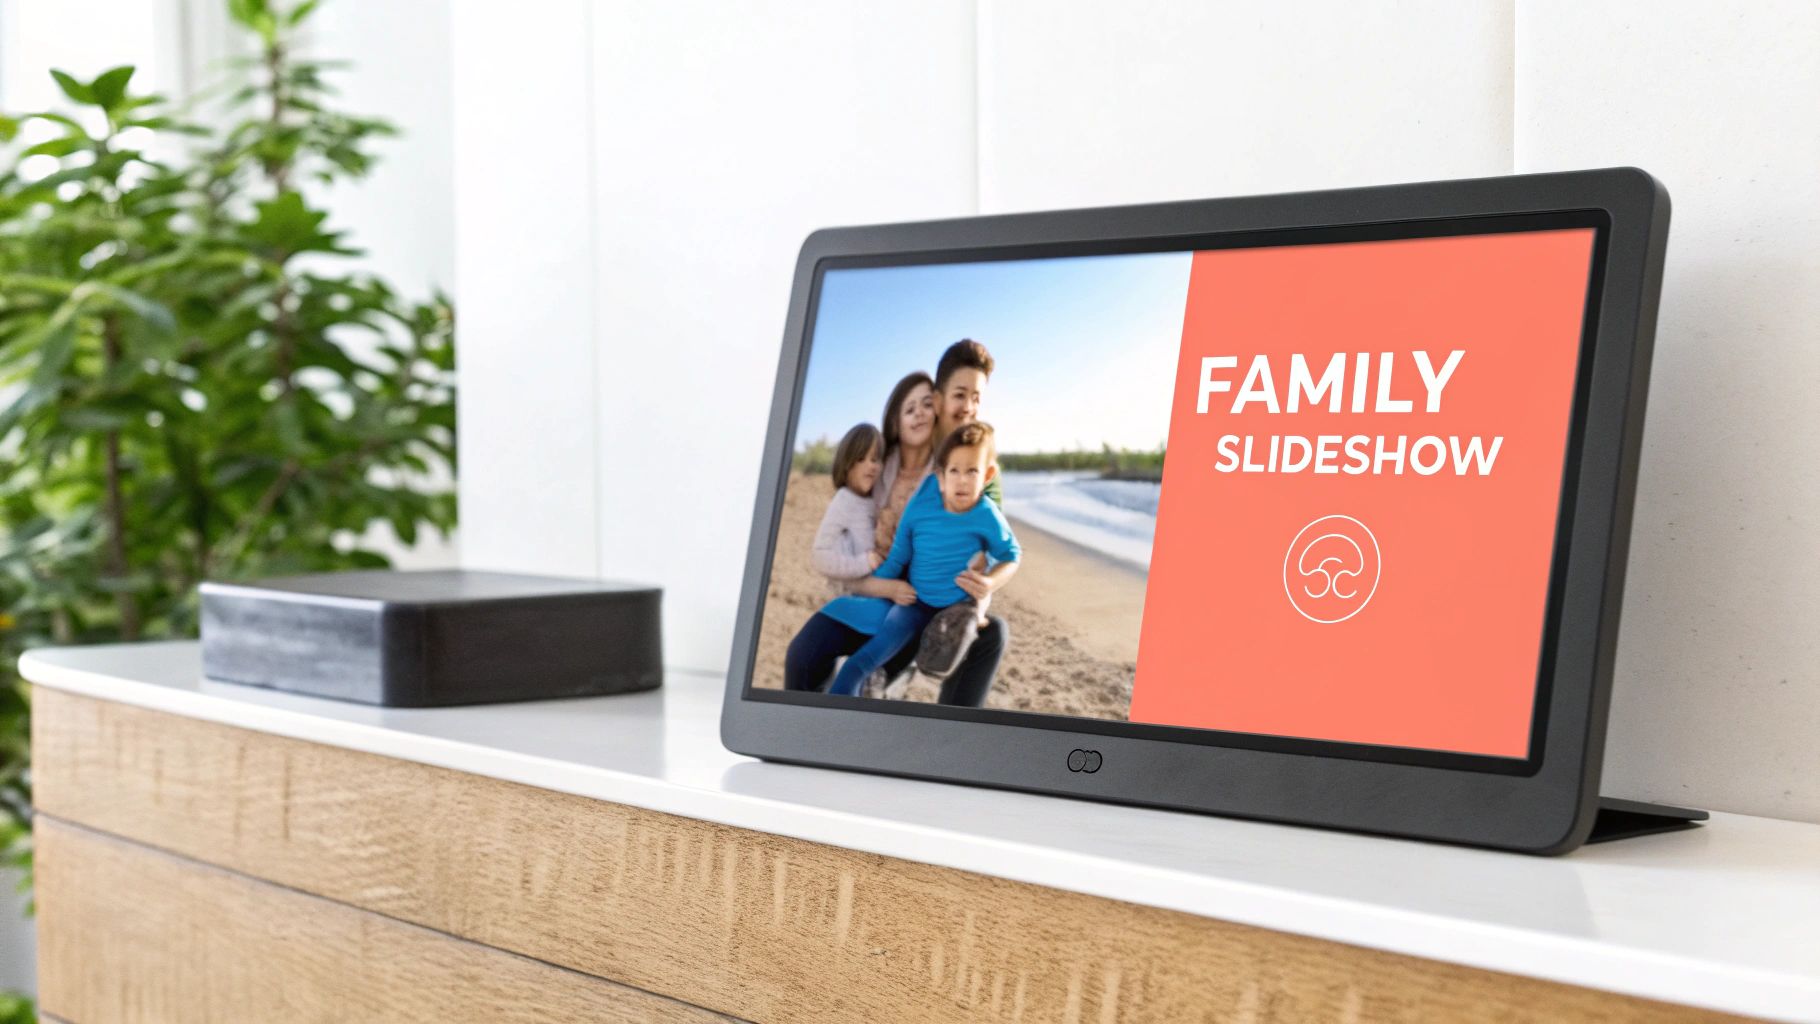
Best For and Key Benefits
This method is ideal for those with a vast digital photo library who want to see more than just a few select prints. It’s perfect for kitchens, home offices, and especially as a heartfelt gift for grandparents, allowing the whole family to send new photos directly to their frame. The key benefit is its endless capacity and ease of updates; a single frame can hold a lifetime of memories, from baby photos to vacation snapshots, without taking up any additional wall space. It keeps your decor fresh and your loved ones feeling connected.
How to Style Your Digital Display
Maximizing the impact of your digital frame is all about curation and placement.
- Curate Your Collections: Group photos into themed albums like "Family Vacations," "Holiday Memories," or "Baby's First Year." This creates a more cohesive viewing experience. Many frames allow you to switch between albums easily.
- Optimize Frame Settings: For a natural, photo-like look, choose a frame with a high-resolution screen. Adjust the transition timing to a comfortable pace, typically between 8 and 15 seconds per photo, so each image gets its moment.
- Choose the Right Location: Place the frame in a well-lit area but avoid direct sunlight to minimize screen glare. Models with motion sensors are great for high-traffic areas, as they turn on when someone enters the room and save power when it's empty.
Pro Tip: Complement your high-tech display with a soft, tactile element. Place a custom photo blanket featuring a single, cherished portrait on a nearby sofa or chair. The contrast between the dynamic, glowing images on the screen and the warm, permanent image woven into the blanket creates a beautiful and balanced display of your most precious memories. This combination makes an especially thoughtful holiday gift for grandparents, pairing the ever-changing digital slideshow with a cozy, constant reminder of family love.
4. String Lights and Clip Displays: A Whimsical Photo Cascade
A string light and clip display offers a whimsical and effortlessly charming way to showcase your favorite moments. This method uses decorative string lights interwoven with small clips, allowing you to hang photos in a beautiful, illuminated cascade. It’s one of the most flexible and creative ways to display photos, perfect for creating a warm, ambient glow while keeping your cherished memories in the spotlight. This approach is particularly popular in bedrooms, dorm rooms, and cozy nooks.
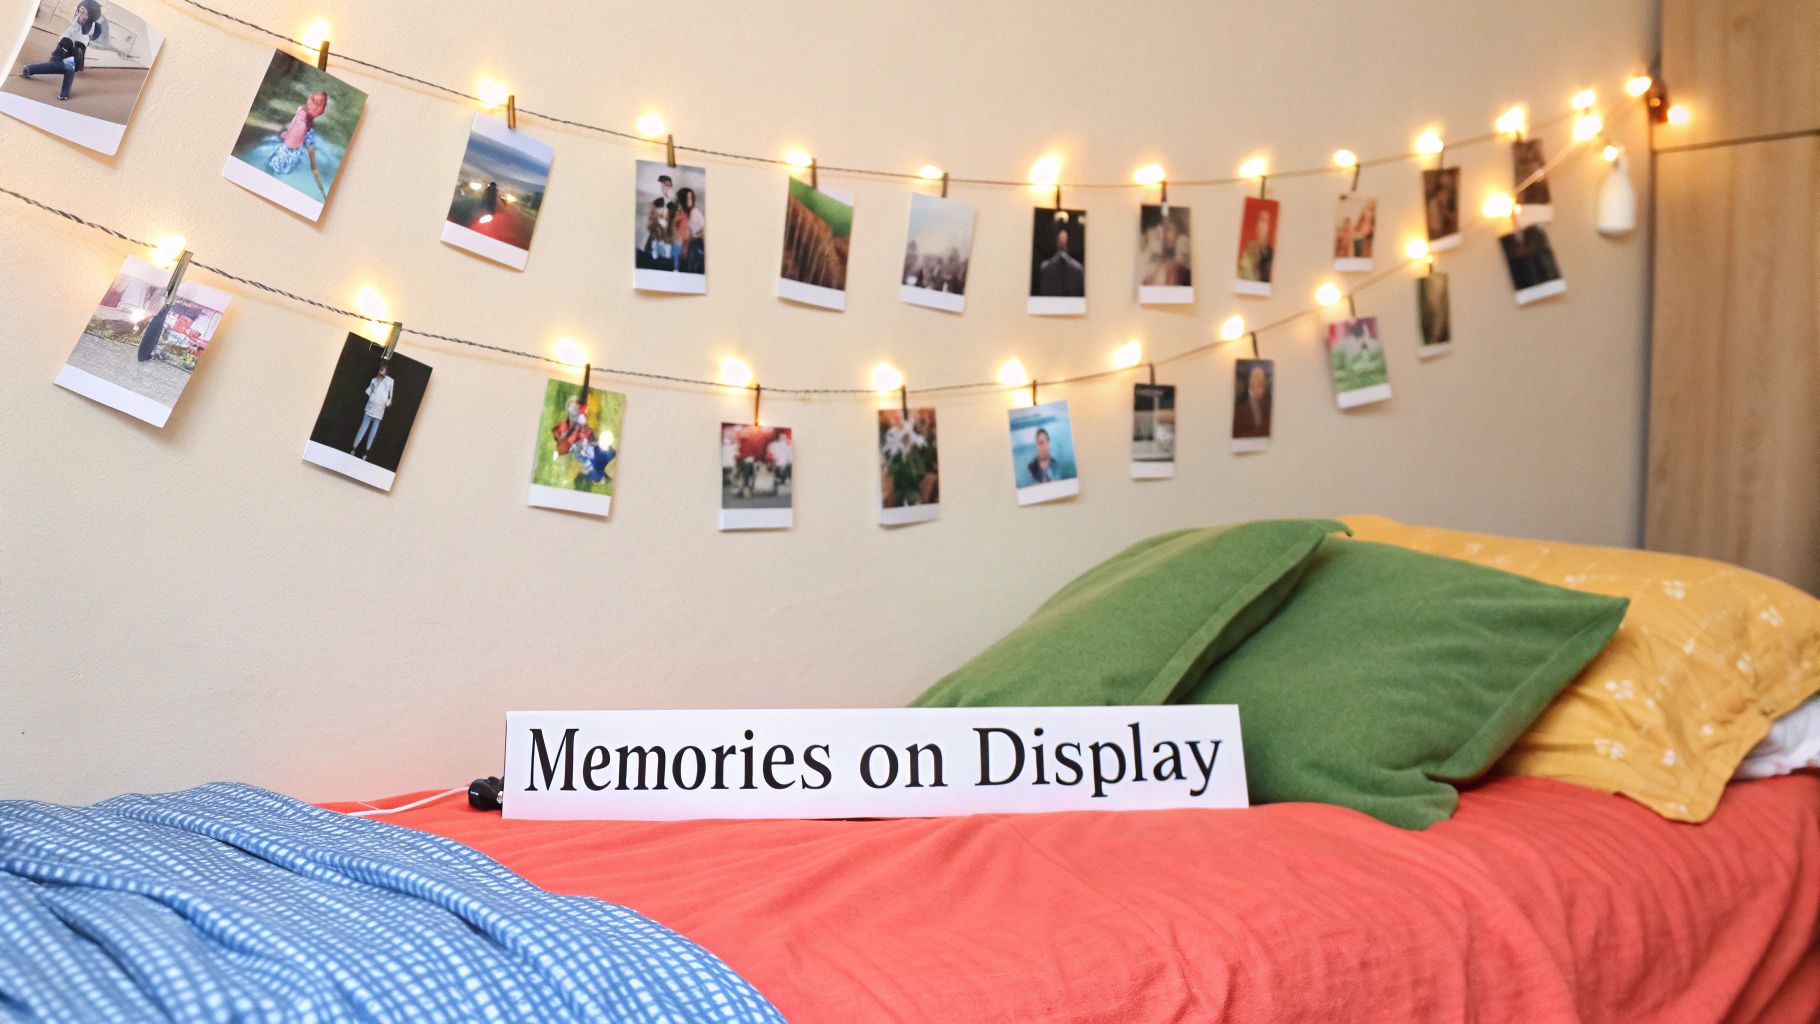
Best For and Key Benefits
This display is ideal for those who love to frequently update their photos, like college students showcasing new friendships or families wanting to feature recent adventures. It's a damage-free solution for renters and anyone hesitant to put nails in the wall. The gentle light adds a layer of warmth and coziness to any room, making it a functional piece of décor that highlights your photos without overwhelming the space. Its affordability and easy setup make it an accessible option for any budget.
How to Style Your Photo Light Display
Creating a magical photo light display is simple and allows for endless creativity.
- Plan Your Pattern: Decide if you want to hang the lights in a straight line, a gentle wave, or a more random zigzag pattern. Use small, clear adhesive hooks to secure the string to the wall without causing damage.
- Balance Your Photos: For a visually pleasing arrangement, space your clips about 6-8 inches apart. Mix vertical and horizontal photos, and consider varying the sizes to add dynamism and prevent the display from looking too uniform.
- Layer with Textures: Combine your photo display with other wall décor elements. Hanging the lights above a tapestry, weaving them around indoor plants, or placing them over a headboard adds depth and personality. Use high-quality photo paper for your prints to ensure they look great and resist fading over time.
Pro Tip: Elevate the cozy atmosphere by anchoring the space with a custom photo blanket draped over a nearby bed or chair. This creates a stunning focal point, especially for a special occasion like a holiday gift. Imagine a beautiful family photo on a soft blanket, complemented by a glowing string of smaller, everyday moments clipped above. This combination turns a simple photo display into a heartfelt and multi-layered tribute to your family's story.
5. Floating Shelves with Photo Display
Floating shelves offer a clean, minimalist way to showcase photos while blending them with other treasured objects. This approach transforms a simple storage solution into a curated display, allowing you to layer framed prints with books, small plants, and decorative accents. It's one of the most flexible creative ways to display photos, as it lets you create an evolving composition that reflects your current tastes and memories.
Best For and Key Benefits
This method is ideal for living rooms, home offices, and bedrooms where you want a display that feels both personal and styled. Floating shelves provide depth and dimension, moving beyond a flat wall presentation. The key benefit is adaptability; you can easily refresh the look by swapping photos, rearranging objects, or adding new pieces without putting more holes in the wall. This makes it perfect for displaying seasonal photos or recent family milestones.
How to Style Your Photo Shelves
Creating a balanced and visually appealing shelf display is about intentional curation.
- Layer and Overlap: Lean smaller frames in front of larger ones to create a sense of depth. Don't be afraid to overlap the edges slightly for a casual, collected look.
- Follow the Rule of Three: Group items in odd numbers, particularly threes, as it's naturally more engaging to the eye. Place a framed photo next to a small plant and a decorative candle, for example.
- Vary Height and Texture: Mix vertical frames with horizontal ones, and place tall objects next to shorter ones. Incorporate different materials like wood, metal, ceramic, and greenery to add texture and interest.
Pro Tip: For a truly cozy and unexpected element, add a personal touch with a folded custom photo blanket on the shelf. A small, neatly folded blanket featuring a favorite family photo can serve as a soft, textural anchor piece among the hard edges of frames and books. This is especially fitting for a nursery or bedroom shelf, bringing warmth and a unique focal point to your display, and makes a wonderful holiday gift.
6. Projection Mapping and Video Displays
For a truly dynamic and modern way to share your memories, projection mapping and video displays transform your photos into an immersive visual experience. This high-tech approach involves using projectors or digital screens to showcase a slideshow of images, often accompanied by motion, transitions, and music. Instead of a static print, your photos become a captivating story that unfolds in real-time, making it one of the most creative ways to display photos for special events or in a contemporary home.
Best For and Key Benefits
This method is perfect for large-scale presentations at weddings, anniversary parties, or milestone birthdays where you want to share a collection of memories with guests. In a home setting, it can turn a media room or living area into a personalized digital art gallery. The primary benefit is its ability to create an emotional, cinematic impact that a single photo cannot. It’s an engaging and unforgettable way to celebrate a life, a relationship, or a special journey with a large audience.
How to Style Your Digital Photo Display
Creating a professional-looking digital display is about curation and technical polish.
- Select High-Resolution Images: To ensure your photos look sharp and clear when projected, use images with a high resolution.
- Plan Your Narrative: Arrange your photos in a chronological or thematic order to tell a cohesive story. Keep the entire slideshow duration between 3-5 minutes to maintain audience engagement.
- Synchronize with Music: Choose a soundtrack that matches the mood of your photos. Timing the photo transitions to the beat or emotional shifts in the music will dramatically enhance the viewing experience.
- Use Simple Transitions: Stick to clean, simple transitions like fades or cross-dissolves between photos. This gives the slideshow a professional and elegant appearance without distracting from the images themselves.
Pro Tip: While a projection is temporary, you can provide a lasting, tangible element for your guests or family. Consider creating a custom photo blanket featuring the "hero" image from your slideshow, such as a beautiful wedding portrait or a cherished family photo. Placed on a couch in the viewing area, it serves as a cozy, permanent keepsake that echoes the digital display, beautifully blending a fleeting moment with an enduring memory.
7. Cork Boards and Pegboards: A Flexible, Evolving Display
For a truly dynamic and interactive photo display, cork boards and pegboards offer an endlessly customizable canvas. This method moves beyond static frames, allowing you to pin, clip, and hang photos alongside notes, ticket stubs, and other meaningful memorabilia. It’s one of the most creative ways to display photos for those who love to refresh their decor, as it transforms a functional surface into a living scrapbook that evolves with your memories and inspirations.
Best For and Key Benefits
This approach is ideal for home offices, creative studios, kitchens, or even a teen's bedroom. A pegboard or cork board acts as an organizational hub and an inspiration station, perfect for mood boards or keeping track of important moments. Its primary benefit is flexibility; you can change the entire look in minutes without damaging your walls. This makes it a fantastic solution for renters or anyone who enjoys frequently updating their visual story.
How to Style Your Board
Creating an aesthetically pleasing board is about balancing organization with creative freedom.
- Create Visual Themes: Group photos and items by color, event, or theme. A section dedicated to a recent vacation, for instance, can be paired with coordinating postcards and color-matched pushpins.
- Embrace Negative Space: Avoid the temptation to cover every inch. Leaving empty space around your photos helps each one stand out and prevents the display from feeling cluttered or overwhelming.
- Layer for Depth: Use varying lengths of string, different types of clips, and overlap photos slightly to create a sense of dimension. This layering technique adds visual interest and a more curated, professional feel.
Pro Tip: Elevate your board by incorporating a textural anchor piece. Instead of just photos, consider pinning up a small, custom photo blanket featuring a favorite family portrait or scenic shot. This adds a soft, unexpected element that draws the eye and makes the entire display feel more cozy and personal, especially as a holiday gift. This unique touch blends tactile comfort with visual storytelling, making your board a true centerpiece.
8. Magnetic and Adhesive Wall Systems
For those who love to refresh their decor or live in a rental where nails are a no-go, magnetic and adhesive systems offer a modern, damage-free solution. This approach uses specialized strips, dots, or even magnetic paint to mount photos directly onto the wall without frames. It's one of the most flexible and creative ways to display photos, allowing you to create dynamic, easily changeable collages that can be updated in minutes.
Best For and Key Benefits
This method is ideal for dorm rooms, home offices, kids' playrooms, and any space where you want the freedom to frequently rearrange your display. The primary benefit is its non-permanence; you can swap out photos, add new ones, or completely redesign the layout without leaving a single mark on the wall. This makes it perfect for showcasing seasonal pictures, event photos, or your children's latest artwork in a clean, minimalist style.
How to Style Your Display System
Creating a sleek display with these systems is all about precision and preparation.
- Create Clean Lines: Arrange your photos in structured horizontal or vertical lines for a polished, organized look. Use a level and a measuring tape to ensure your photos are perfectly aligned, creating a grid-like effect.
- Mix and Match Sizes: Add visual rhythm to your display by mixing different photo sizes. A combination of standard 4x6 prints with larger 5x7 or smaller square prints can create an engaging and dynamic composition.
- Test Your Adhesives: Before committing to a full wall, test your chosen adhesive on a small, inconspicuous area to ensure it holds the photo's weight without damaging the paint. Choose acid-free adhesives to protect your prints from long-term discoloration.
Pro Tip: Elevate this minimalist display by incorporating a soft, textural centerpiece. A custom photo pillow placed on a nearby chair or bench can feature a favorite image from the wall display in a larger, more prominent format. This creates a beautiful visual link between your wall and your room's decor, adding a layer of cozy, personalized comfort that complements the clean lines of the frameless photos.
9. Photo Collage and Canvas Prints: A Story in a Single Frame
A custom photo collage on canvas offers a sophisticated and unified way to tell a bigger story. This method combines multiple cherished images into one professionally printed piece, transforming a collection of individual moments into a single, cohesive work of art. It’s one of the most creative ways to display photos because it elegantly blends different memories, such as a year's worth of milestones or a favorite vacation, into a high-impact, museum-quality print.
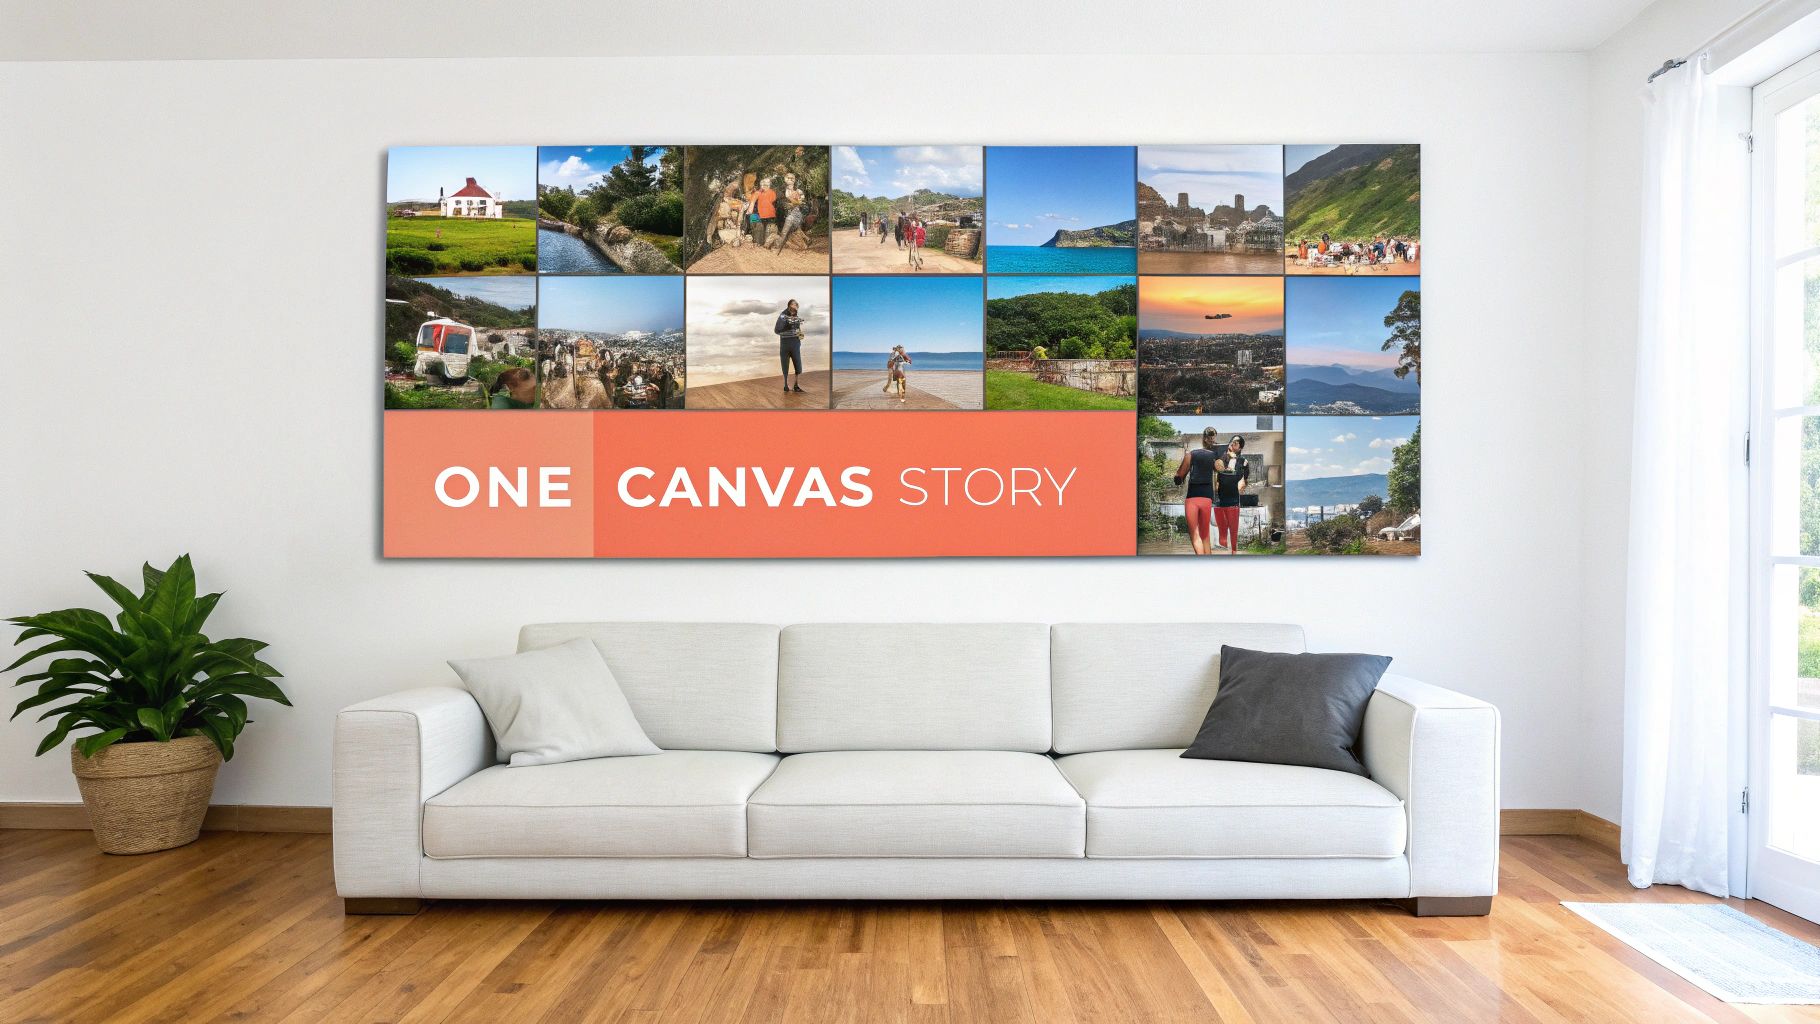
Best For and Key Benefits
This display style is perfect for creating a focal point in a master bedroom, home office, or living room. Unlike a traditional gallery wall, a canvas collage requires only one nail and presents a clean, frameless look that feels modern and intentional. It’s an ideal solution for commemorating a specific event like a wedding, a newborn's first year, or a family reunion, allowing you to showcase the full narrative in a single, streamlined display.
How to Style Your Photo Collage Canvas
Designing a beautiful canvas collage is all about curation and composition.
- Create a Visual Theme: Select photos that share a complementary color palette or a consistent theme. A series of black-and-white images or photos from a single event with similar lighting will create a more polished and harmonious look.
- Balance Your Layout: Choose a layout that guides the viewer's eye through the images. A balanced grid creates a formal, structured feel, while an asymmetrical or freeform layout can feel more dynamic and playful.
- Prioritize Image Quality: Always use high-resolution photos to ensure your canvas print is sharp and vibrant. Low-resolution images can appear blurry or pixelated when enlarged. To dive deeper into the design process, our guide on how to create a photo collage offers step-by-step instructions.
Pro Tip: Elevate your display by pairing a photo collage canvas with a complementary tactile element. A custom photo blanket featuring a single, standout image from the collage creates a beautiful echo. Draping this blanket over a nearby sofa or bed ties the room together, extending the visual story from the wall into the living space for a truly immersive and heartfelt decor experience.
10. Window and Transparent Surface Displays
Transforming windows and other glass surfaces into photo galleries is a truly unconventional and creative way to display photos. This method involves using transparent spaces like windows, glass room dividers, or even shower doors to showcase your favorite images. By using simple tools like suction cups or special adhesives, you turn these everyday surfaces into dynamic displays that play with natural light, creating an ethereal, stained-glass effect.
Best For and Key Benefits
This approach is ideal for those living in apartments or smaller spaces where wall space is limited, but window real estate is plentiful. It’s also perfect for adding a touch of personality to unexpected places like a bathroom or a sunny kitchen. The key benefit is the interaction with light; as the sun moves throughout the day, your photos will be illuminated in different ways, bringing them to life. This method is temporary, damage-free, and easily changeable, making it a fantastic option for renters or seasonal decorating.
How to Style Your Transparent Displays
Styling photos on glass is all about embracing light and creating visual interest.
- Choose the Right Photos: Opt for images with strong silhouettes, vibrant colors, or high contrast that will look stunning when backlit by the sun. Landscapes, portraits, and abstract shots work particularly well.
- Secure Safely: Use small suction cups with hooks or clear, removable adhesive dots for a secure, non-permanent hold. Always test adhesives on a small, inconspicuous area first to ensure they won’t leave residue.
- Waterproof for Wet Areas: If you’re decorating a shower door or bathroom window, make sure to laminate your photos or print them on waterproof material to protect them from moisture and steam.
Pro Tip: Extend this concept of transparency and light by complementing your window display with a custom photo blanket featuring a similar theme. A lightweight fleece or sherpa blanket with a vibrant, sun-drenched photo, draped over a nearby chair, will catch the natural light from the window and echo the glowing images on the glass, creating a cohesive and beautifully illuminated corner in your home. This makes for an especially thoughtful gift for a loved one.
Comparison of 10 Creative Photo Display Ideas
| Display Method | Implementation 🔄 (Complexity) | Resources & Cost ⚡ | Expected Outcomes ⭐📊 | Ideal Use Cases 📊 | Key Advantages & Tips 💡 |
|---|---|---|---|---|---|
| Gallery Wall | Medium–High: planning, measuring, multiple hangings | Multiple frames, hardware; medium cost | High-impact focal display ⭐⭐⭐ | Living rooms, hallways, curated spaces | Maximizes wall space; lay out on floor or use templates; keep spacing consistent |
| Photo Books & Coffee Table Books | Medium: curation, layout, ordering | Printing and binding costs; one-time moderate investment | Permanent, intimate narrative keepsake ⭐⭐ | Gifts, albums, storytelling collections | Start with clear theme; use consistent editing; invest in quality paper |
| Digital Photo Frames | Low–Medium: device setup, WiFi configuration | Device, power, WiFi; moderate upfront cost | Dynamic rotating display; easy updates ⭐⭐ | Family displays, remote updates, large collections | Choose high-res frame; use motion sensors; set 8–15s transitions |
| String Lights & Clip Displays | Low: simple install, minimal tools | Low cost; battery or plug; clips/wire | Casual, warm ambient display ⭐ | Dorms, renters, temporary or seasonal displays | Use quality photo paper; space clips 6–8 in; battery lights for flexibility |
| Floating Shelves with Photo Display | Medium: mounting + styling | Shelves, anchors, decor items; medium cost | Layered, designer-curated look ⭐⭐ | Entryways, living rooms, minimalist/eclectic spaces | Follow rule of three; mix objects and photos; avoid clutter |
| Projection Mapping & Video Displays | High: technical setup, calibration | Projector/video wall, audio, professionals; high cost | Immersive, memorable large-scale experience ⭐⭐⭐ | Events, installations, wedding receptions, galleries | Use high-res images; test placement and lighting; sync music to transitions |
| Cork Boards & Pegboards | Low: easy install and updates | Affordable boards and pushpins | Flexible, interactive inspiration boards ⭐ | Studios, offices, mood/inspiration boards | Organize by theme or color; leave negative space; layer for dimension |
| Magnetic & Adhesive Wall Systems | Low–Medium: surface prep and testing | Magnetic strips/panels or adhesives; low–medium cost | Clean, minimalist, renter-friendly display ⭐⭐ | Rentals, frequently-updated photo walls, offices | Use acid-free adhesives; test strength; print matte for better adhesion |
| Photo Collage & Canvas Prints | Medium: design and professional printing | Professional printing (canvas/metal); higher cost | Polished, long-lasting statement piece ⭐⭐ | Focal walls, gifts, professional presentations | Use 300 DPI images; match room palette; order samples first |
| Window & Transparent Surface Displays | Low–Medium: attachment testing, placement | Suction cups, adhesive dots, tape; low cost | Unique, light-interacting displays; double-sided viewing ⭐ | Retail windows, bathrooms, creative small spaces | Use suction cups for damage-free install; pick images that work with backlight; waterproof if needed |
Bring Your Memories to Life, Your Way
Displaying your photos is more than just an interior design choice; it is a profound act of storytelling. As we have explored throughout this guide, the methods you use to showcase your memories can transform a house into a home, infusing every room with personality, warmth, and the narrative of your life. Your walls, shelves, and even your furniture become a canvas for your most cherished moments, turning digital files into tangible points of connection.
The journey through these creative ways to display photos reveals one central truth: there is no single "right" way to do it. The perfect method is deeply personal, reflecting your aesthetic, the architecture of your space, and the emotional resonance of the images themselves. From the classic, curated elegance of a gallery wall to the dynamic, ever-changing story told by a digital frame, each technique offers a unique way to engage with your past and celebrate your present.
Synthesizing Your Personal Style
The key takeaway is to move beyond simply placing a framed photo on a table. Think about interaction, texture, and integration. Consider how different methods can work together to create a cohesive yet diverse visual experience.
- For the traditionalist with a modern twist: A structured gallery wall can be complemented by a cozy corner featuring a custom photo blanket, turning a functional item into a conversation-starting display.
- For the minimalist: Floating shelves offer a clean, uncluttered way to exhibit a rotating collection of prints, while a high-resolution digital frame can showcase thousands of images without occupying physical space.
- For the creative and unconventional: A pegboard system provides ultimate flexibility, allowing you to mix photos with mementos and change the layout on a whim. This pairs wonderfully with the playful, casual nature of a string light and clip display in another area, like a teen's bedroom or a home office.
The goal is to select ideas that not only look good but also feel right for your lifestyle. A family with young children might find more joy in a durable, large-scale canvas print or a soft photo pillow than in delicate, glass-fronted frames. A couple celebrating an anniversary could project a slideshow of their life together for a special event, a truly immersive and creative way to display photos that transcends static décor.
Actionable Next Steps: Turning Inspiration into Reality
Now that you are armed with a wealth of ideas, it is time to take action. Do not let your favorite photos languish on a hard drive. Follow this simple plan to get started:
- Curate Your Collection: Begin by selecting a small group of photos you absolutely love. Focus on a specific theme, event, or color palette to create a cohesive starting point.
- Assess Your Space: Identify a specific wall, corner, or piece of furniture you want to transform. Measure the area and consider the existing light, traffic flow, and color scheme.
- Choose Your Method: Match your curated photos and chosen space with one of the ideas from this article. Whether it is the architectural feel of floating shelves or the tactile comfort of a photo blanket, commit to one project first.
- Execute and Enjoy: Gather your materials and dedicate time to bringing your vision to life. The process itself is part of the fun, and the result is a home that more accurately reflects the people and memories within it.
By intentionally weaving your personal history into your living space, you are not just decorating; you are building an environment that actively nurtures and reminds you of the love, joy, and adventures that define you. Every glance at a photo becomes a small, beautiful moment of reflection.
Ready to turn your most treasured memories into a cozy and functional work of art? Explore the custom photo blankets and pillows at That Blanket Co to create a unique display piece that brings both comfort and personal style to any room. That Blanket Co makes it simple to transform your favorite photos into a beautifully crafted keepsake you can enjoy every day.