


How to Make Photo Pillow: Step-by-Step Guide 2026
You've got the photo open on your phone: the one from the summer cookout, or the dog asleep in a patch of sun, or your mother cutting a cake with her eyes half closed. Now you're on a product page reading "16 x 16" and "18 x 18," wondering whether the file in your camera roll is good enough to print.
Most disappointments have nothing to do with taste. They come down to three unglamorous decisions: how many pixels the file really holds, where the subject sits inside the crop, and how the fabric behaves once the ink is in it. Get those right and a phone photo looks like it was shot for the pillow. Get them wrong and a professional camera still produces a soft rectangle.
Pillow Sizes and Image Resolution at a Glance
Say you're standing at the kitchen counter with the photo on your phone and the size options on a laptop screen. The two sizes you'll choose between are 16 by 16 inches and 18 by 18 inches. Before you look at the photo again, check the numbers it needs to hit.
| Pillow size | 150 PPI (minimum) | 200 PPI (comfortable) | 300 PPI (detailed) |
|---|---|---|---|
| 16 x 16 inch | 2,400 x 2,400 px | 3,200 x 3,200 px | 4,800 x 4,800 px |
| 18 x 18 inch | 2,700 x 2,700 px | 3,600 x 3,600 px | 5,400 x 5,400 px |
Read the columns as budgets, not grades. 150 pixels per inch is the floor most fabric printers will accept before edges and eyelashes start to blur. 200 PPI is comfortable for a close-up face you'll look at from arm's length. 300 PPI is for the details that punish softness: pet fur, lettering, lace, a jersey number.
The calculation repeats for any file. Multiply the pillow width in inches by the density you want. A 16-inch pillow at 200 PPI needs 3,200 pixels on each side; the same pillow at 300 PPI needs 4,800. The Library of Congress digitizing standards use the same logic for archival work, where an 8.5 by 11 inch page scanned at 200 dpi lands at roughly 1,700 by 2,200 pixels, a working definition of "enough detail to read."
What that file is tagged with changes nothing. A DPI tag in the metadata is a label, not a quantity of information; the pixel dimensions and the physical print size decide the result. Our guide to the best photo resolution for printing covers the same principle in more depth.
The 10-second check: open the file's dimensions, take the shorter side, and divide it by the pillow width. Under 150 and you need a different file or a smaller pillow.
Modern phone cameras capture several thousand pixels on the long side, so one full-frame shot often covers the 16-inch size comfortably. It's the crop that breaks things: cut a group shot down to one face and you may be working with a fraction of those pixels. If you want the arithmetic laid out for other formats, this walkthrough on how to match pixels to print size is a useful second opinion.
Choose a Photo That Prints Well on Fabric
Fabric is not paper. The image is laid across a soft, slightly textured surface that swallows fine detail and enlarges softness, which is why the source file matters more than any filter you could apply afterward.
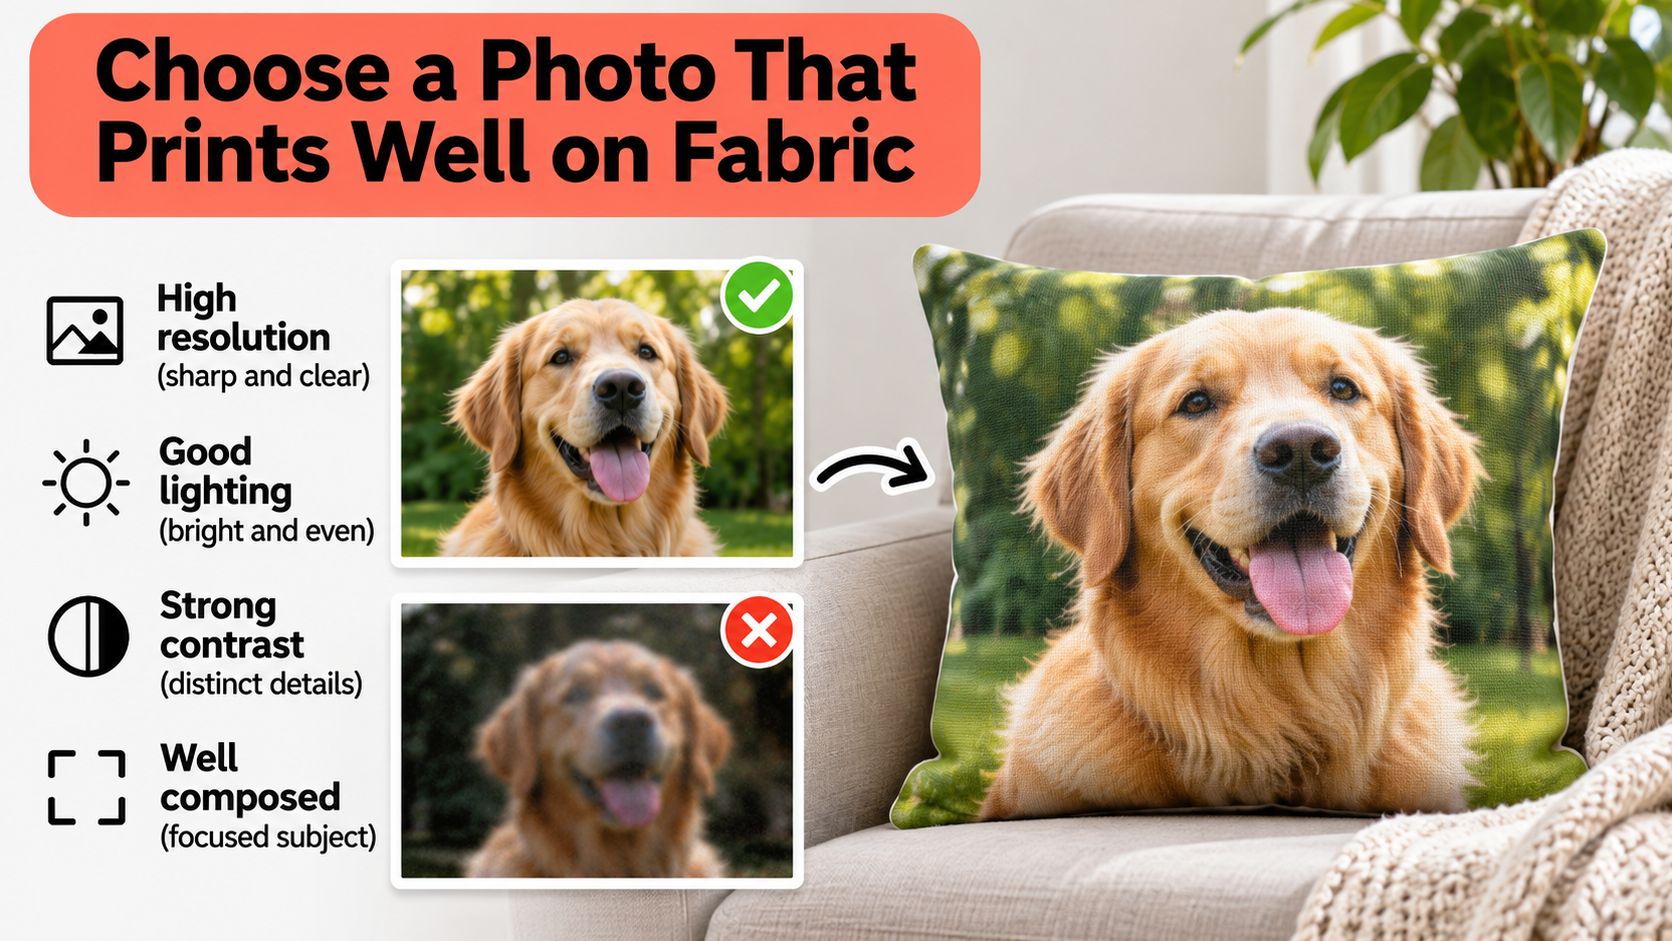
The five-point photo check
- Start with the original. Pull the file straight from the camera roll or cloud library, not from a text thread, a screenshot or a social download. Messaging apps and social platforms recompress images and throw away usable pixels in the process.
- Check focus where it counts. Sharp eyes beat a big file every time. A tightly framed, well-lit photo at 2,600 pixels often prints better than a 5,000-pixel shot that missed focus.
- Measure the face after cropping. If your subject's head fills a small corner of the frame, it will fill a small corner of the pillow and look soft. Crop tight before you judge.
- For pets and kids, freeze the motion. Eyes open, no blurred ears or hair edges. Fur and flyaway hair are the first things to smear when a fast shutter speed wasn't there.
- Prefer light over megapixels. A photo taken near a window will usually print beautifully; one taken in a dim kitchen can be brightened, but brightening doesn't recover detail that was never captured.
The trade-off worth internalizing: the largest file is not automatically the best file. A slightly smaller image with clean subject separation and even light wins over a bigger, muddier one almost every time.
If you'd rather watch the selection logic than read it, this walkthrough covers the same ground with examples.
When two candidates look equally good on a phone screen, get a second set of eyes. You can send photos to support@thatblanket.co for free feedback within 24 hours on which photos will print well, which may need adjustments, and why, with no commitment required.
How to Make Your Photo Pillow Step by Step
The whole job fits into one sitting, roughly the length of a coffee. Order matters more than speed, because each step constrains the next one.
- Pick the size before anything else. The 18-inch square suits a sofa or a reading chair; the 16-inch works on a bench, an armchair or a crib. The size sets your pixel target and your crop shape, so choosing it later means redoing both.
- Upload the original file. Add a collage in the order you want the images to read, and put the most important face in the center rather than a corner.
- Crop to the square. Keep faces and key details inside the central safe area. Seams consume the outer edge of the panel, so anything within a half inch of the border is at risk.
- Add text or a date, briefly. Short lines sit comfortably; long ones crowd the margins and are the first thing to clip. Give lettering clear space on every side.
- Open the preview at full size. The thumbnail is a lie. The full preview shows the actual crop, proportions and placement.
- Compare the proof against your original. Put them side by side on the same screen at the same brightness. If the proof looks washed out or over-saturated now, it will look that way on fabric.
- Check out and note the production window. Write the expected timeline down against the date you need the gift, not against today.
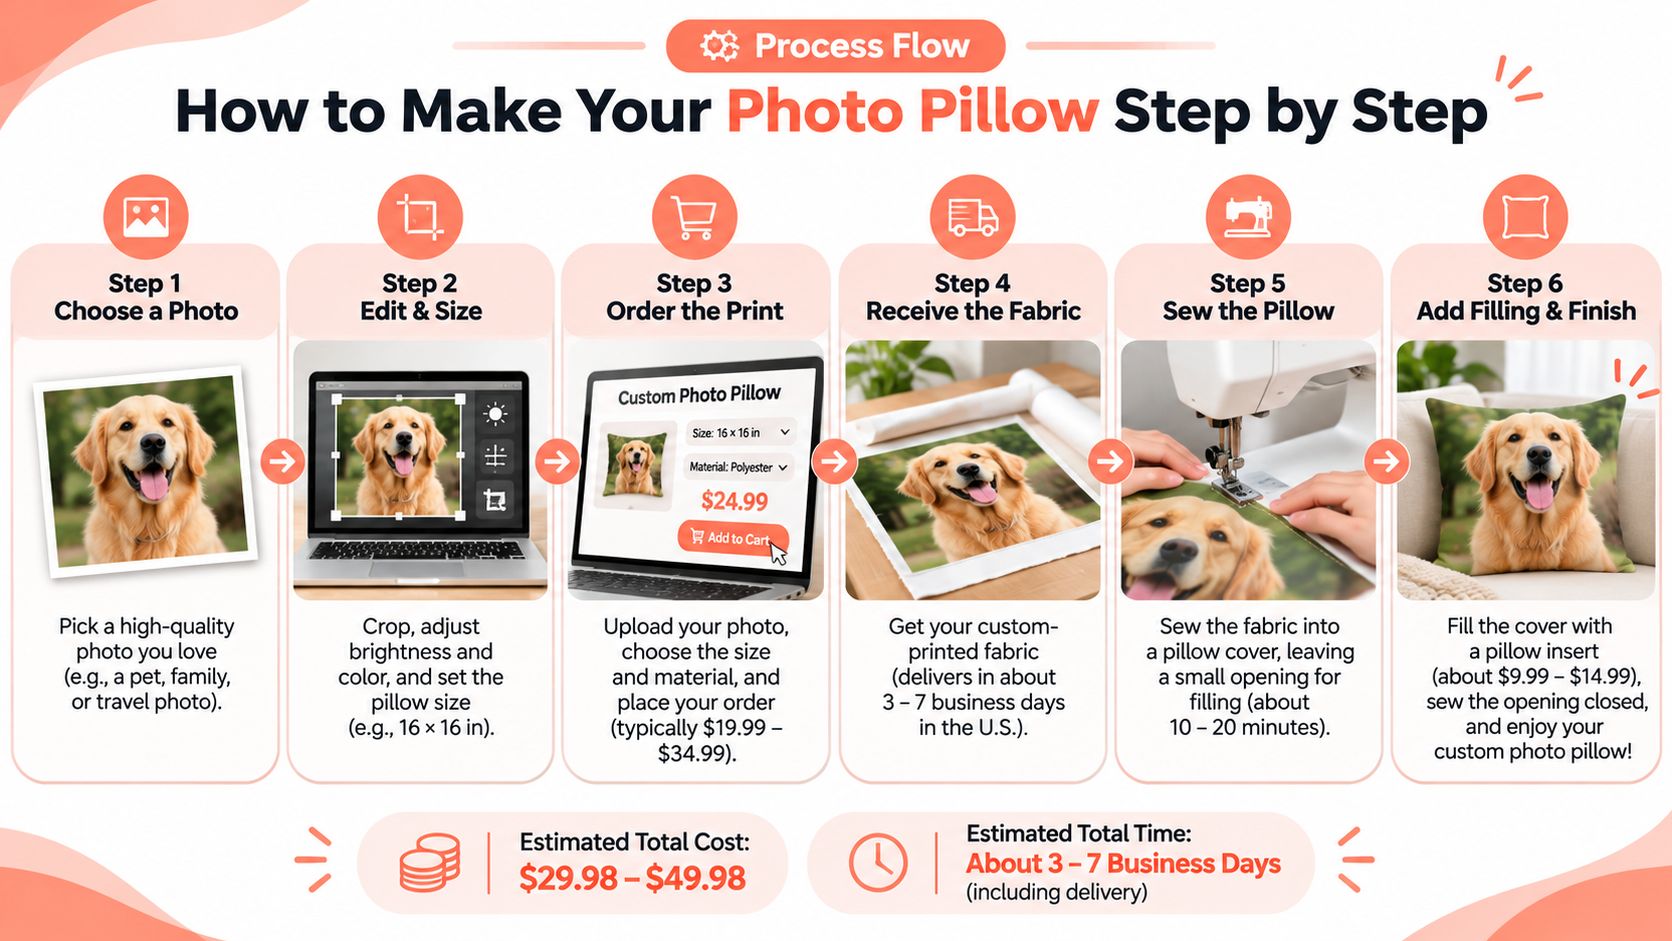
The printing method explains why some of these steps matter so much. Our explainer on how dye-sublimation printing on fabric works covers why the ink bonds into synthetic fiber rather than sitting on top of it, which affects both sharpness and how the surface survives washing.
If you're building a matching set, Custom Photo Blankets run through the same upload flow, so the photo, crop and text you've already tuned can carry straight over to a throw without starting again.
Common Mistakes and How to Fix Them
The mistake that shows up most often is a face sliced by a seam. It happens because people center the whole photograph instead of the person, and the outer edge of a square crop disappears into the seam allowance during construction. The fix is simple and free: move the subject inward, leave breathing room at the border, and let the background take the hit.
| Symptom | Likely cause | Fix |
|---|---|---|
| Faces look soft or blocky | Low-pixel or compressed source | Find the original file and use a tighter crop |
| Face cut by a seam | Subject placed near the edge | Move the subject into the central safe area |
| Text clipped at the edge | Text placed too close to the border | Shorten the text and keep it inside the margins |
| Colors look dull | Screen brightness or contrast differs from fabric | Lift brightness and contrast slightly before upload |
| Collage feels cluttered | Too many images at similar sizes | Keep the strongest two or three and enlarge them |
| Print looks blurry | Photo taken in low light or motion | Use a sharper shot or a different photo |
Three habits prevent most of these. Zoom to 100 percent on the proof and inspect eyes and text before approving; that's where softness announces itself. If colors look flat, nudge brightness and contrast up slightly before upload rather than hoping the printer compensates. And resist the urge to pack a collage: small faces lose detail the moment they're enlarged across a 16-inch panel.
Recovering from a bad file is usually a search problem, not an editing problem. Dig for the older original in cloud storage before you settle for the compressed copy.
If a collage feels busy, drop the weakest image and let the strongest one grow. Then run the final check: dimensions meet your target, faces sit inside the safe area, text is legible at full size, and the proof matches the look you intended.
Caring for Your Photo Pillow Over Time
The question buyers ask most is whether it can go in the washing machine. Ours can. The cover is removable and machine washable, the insert stays out of the machine, and the panel is premium fleece with a single-sided, edge-to-edge print, machine washable and tumble dried low.
Cold water, a gentle cycle, mild detergent, low friction and air drying all reduce stress on a printed surface. The reasoning is mechanical: heat and agitation work on fibers and on the ink inside them, and every extra cycle takes a small toll. Direct sunlight is the other slow thief, accelerating fading and dimensional change in anything left on a sunny sill for months. Zip the cover closed or tuck the zipper in before washing, and pull the insert first so the cover can move freely.
Dye-sublimation reduces cracking and peeling compared with decoration applied as a surface layer, but it is a printing-method advantage, not a promise of permanent color. Treat that as an engineering fact about how the ink sits in the fiber, not a warranty.
Honest expectation: a photo pillow washed monthly and parked in direct sun will look different in three years than one spot-cleaned and kept out of the light. Both are normal.
| Use | Main priority | Care approach |
|---|---|---|
| Nursery or pet pillow | Washability and concealed closures | Remove the cover, wash cold on gentle, air dry |
| Anniversary or decor pillow | Color fidelity and display location | Spot clean, keep out of direct sun |
| Daily sofa pillow | Abrasion resistance and insert recovery | Machine wash cover on gentle, tumble dry low, fluff insert |
That use-case split explains why personalized gifts keep growing: the U.S. personalized gifts market was reported at $9.69 billion in 2024 and forecast to reach $14.56 billion by 2030 by Grand View Research, which makes practical ownership guidance more useful than another inspirational gallery. Match the care plan to the pillow's job, and it stays presentable through the years it's meant to mark.
Plan Your Holiday Photo Pillow Order Now
November and December are the core U.S. winter-holiday shopping period, and the numbers make the case for starting today. The National Retail Federation defines its holiday forecast around those two months and expects 2026 retail sales to reach $1.013 trillion, a 4.2% increase over 2025. The same forecast notes that 43% of holiday shoppers plan to begin browsing or buying before November.
That early-start instinct is right, because the production calendar compresses fast. Deloitte's 2026 holiday survey found 77% of shoppers active in late November and 78% active in early December, with 70% planning to shop during Thanksgiving week. Your order queues behind everyone else's in exactly the weeks it needs to ship.
Three gift directions that print well: a childhood photo of the recipient with a parent, a family collage drawn from a single year, and a pet photo for the relative who misses the animal most. Custom Photo Blankets make a natural companion piece, since a family that wants a throw and a pillow can reuse one design across both and keep the set visually matched.
A seven-day order plan
- Day 1: choose the one photo that matters most. Not five. One.
- Day 2: check its pixel dimensions against the table above and confirm the density works for your chosen size.
- Day 3: send your two strongest candidates for free feedback before you commit to a crop.
- Day 4: crop, add any text, and review the full-size preview.
- Day 5: approve the proof after a 100 percent zoom on eyes and lettering.
- Day 6: place the order.
- Day 7: confirm the shipping address and the arrival window.
The date rule is the one people skip. Fix the occasion date first, count backwards through the production and shipping window shown at checkout, then add a few buffer days. Over 50,000 customers have ordered photo gifts here, and personalized photo blankets currently take 20% off automatically at checkout, so the only real variable left is whether your file is ready. For more seasonal ideas, browse our holiday gifting ideas.
A photo pillow is a small project with a short list of things that can go wrong, and every one of them is fixable before you order: the file size, the crop, the proof, the care plan. That Blanket Co makes Custom Photo & Text Pillows in 16 x 16 and 18 x 18 inches with edge-to-edge printing and a removable, machine-washable cover, plus Custom Photo Blankets when you want a matching throw from the same photo. Send your two best candidates to support@thatblanket.co for free feedback within 24 hours, then visit That Blanket Co to turn the picture on your phone into something the family keeps.