


10 Creative Ways to Display Photos Without Frames in 2026
Your walls are a canvas for your life's best moments, but traditional frames can feel limiting and expensive. It's time to think outside the box and transform your favorite photos into unique, personal art. This guide explores 10 creative ways to display photos without frames, offering fresh, stylish, and often budget-friendly solutions to showcase your memories. Whether you're decorating a nursery, updating your living room for the holidays, or looking for a heartfelt Mother's Day gift, these ideas will inspire you to turn your cherished pictures into captivating focal points.
We'll cover everything from simple DIY projects to sophisticated installations, ensuring there's a perfect match for every style, room, and budget. These methods not only highlight your photographs but also add texture, personality, and warmth to your home decor. To delve deeper into personalizing your space with unique setups, explore more DIY photo display ideas. For an even cozier approach, consider how a custom photo blanket can transform a precious image into a functional piece of art you can wrap up in. From dynamic clipboard walls to illuminated string light garlands, you'll find actionable steps to bring your vision to life and give your memories the distinctive presentation they deserve.
1. Photo Collage Wall with Clipboards and String
A clipboard and string gallery wall is one of the most dynamic and creative ways to display photos without frames, offering a modern, relaxed aesthetic. This approach involves suspending wooden or metal clipboards from twine or wire, using the clipboard’s built-in clip to secure your favorite prints. The result is an easily changeable display perfect for evolving family stories and seasonal decor.
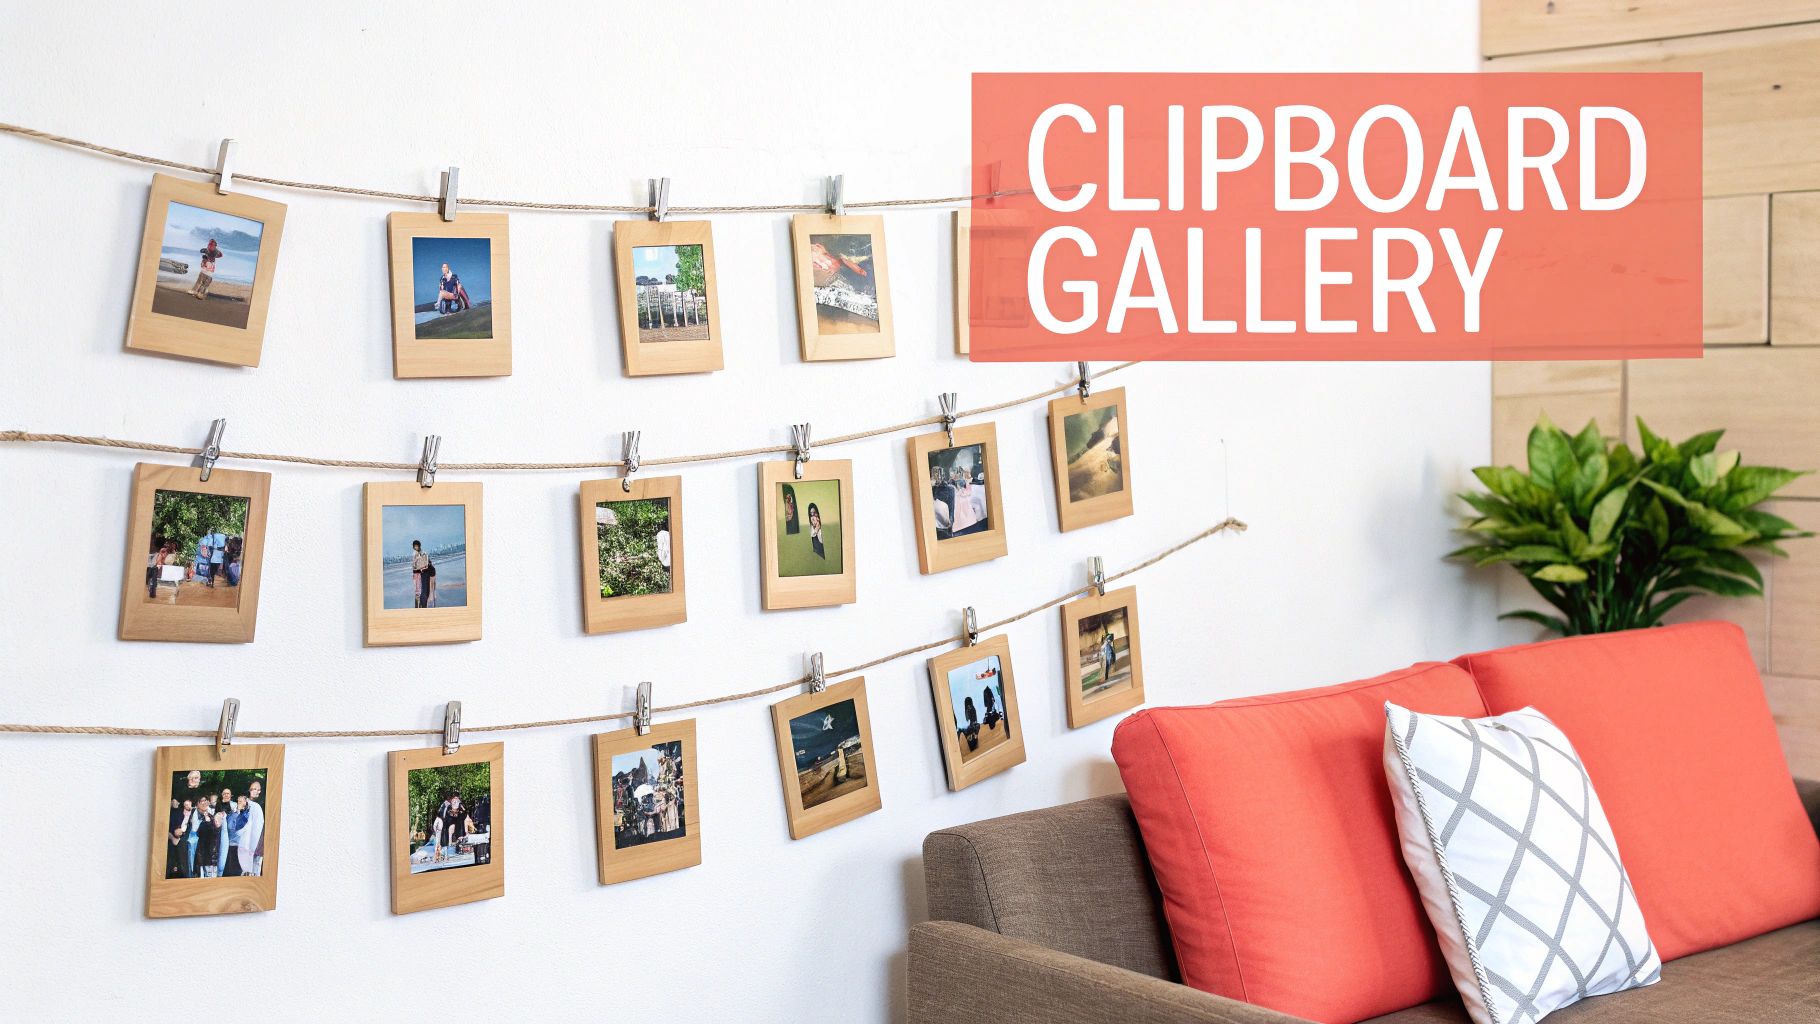
This method is popular in nurseries and family rooms, where you can easily swap photos as children grow or new memories are made. It provides a beautiful, personalized touch that complements other custom decor, like a cozy Custom Photo Blanket draped over a nearby chair.
How to Create Your Clipboard Display
- Gather Materials: You will need clipboards (wood, metal, or acrylic), sturdy string or wire, small nails or command hooks, and your chosen photos (4x6 or 5x7 prints work best).
- Plan Your Layout: Arrange the clipboards on the floor first to visualize the final look. Varying the heights and spacing creates visual interest and a more organic feel.
- Install and Display: Secure your string or wire to the wall with nails or hooks. Hang the clipboards and attach your photos.
For more inspiration on arranging your pictures, you can explore detailed tips on how to create a stunning photo collage. This method is not just for homes; it’s a brilliant idea for rental properties or even as a unique gift, especially for Mother’s Day, allowing Mom to refresh her favorite family moments with ease.
2. Floating Shelves with Easel-Propped Photos
Using floating shelves to display photos propped on small easels is a sophisticated and highly curated way to showcase your memories. This method combines the clean lines of modern decor with the personal touch of your favorite pictures, creating a gallery-like effect without the commitment of traditional frames. It’s a versatile approach that allows for easy updates and a layered, dimensional look on any wall.
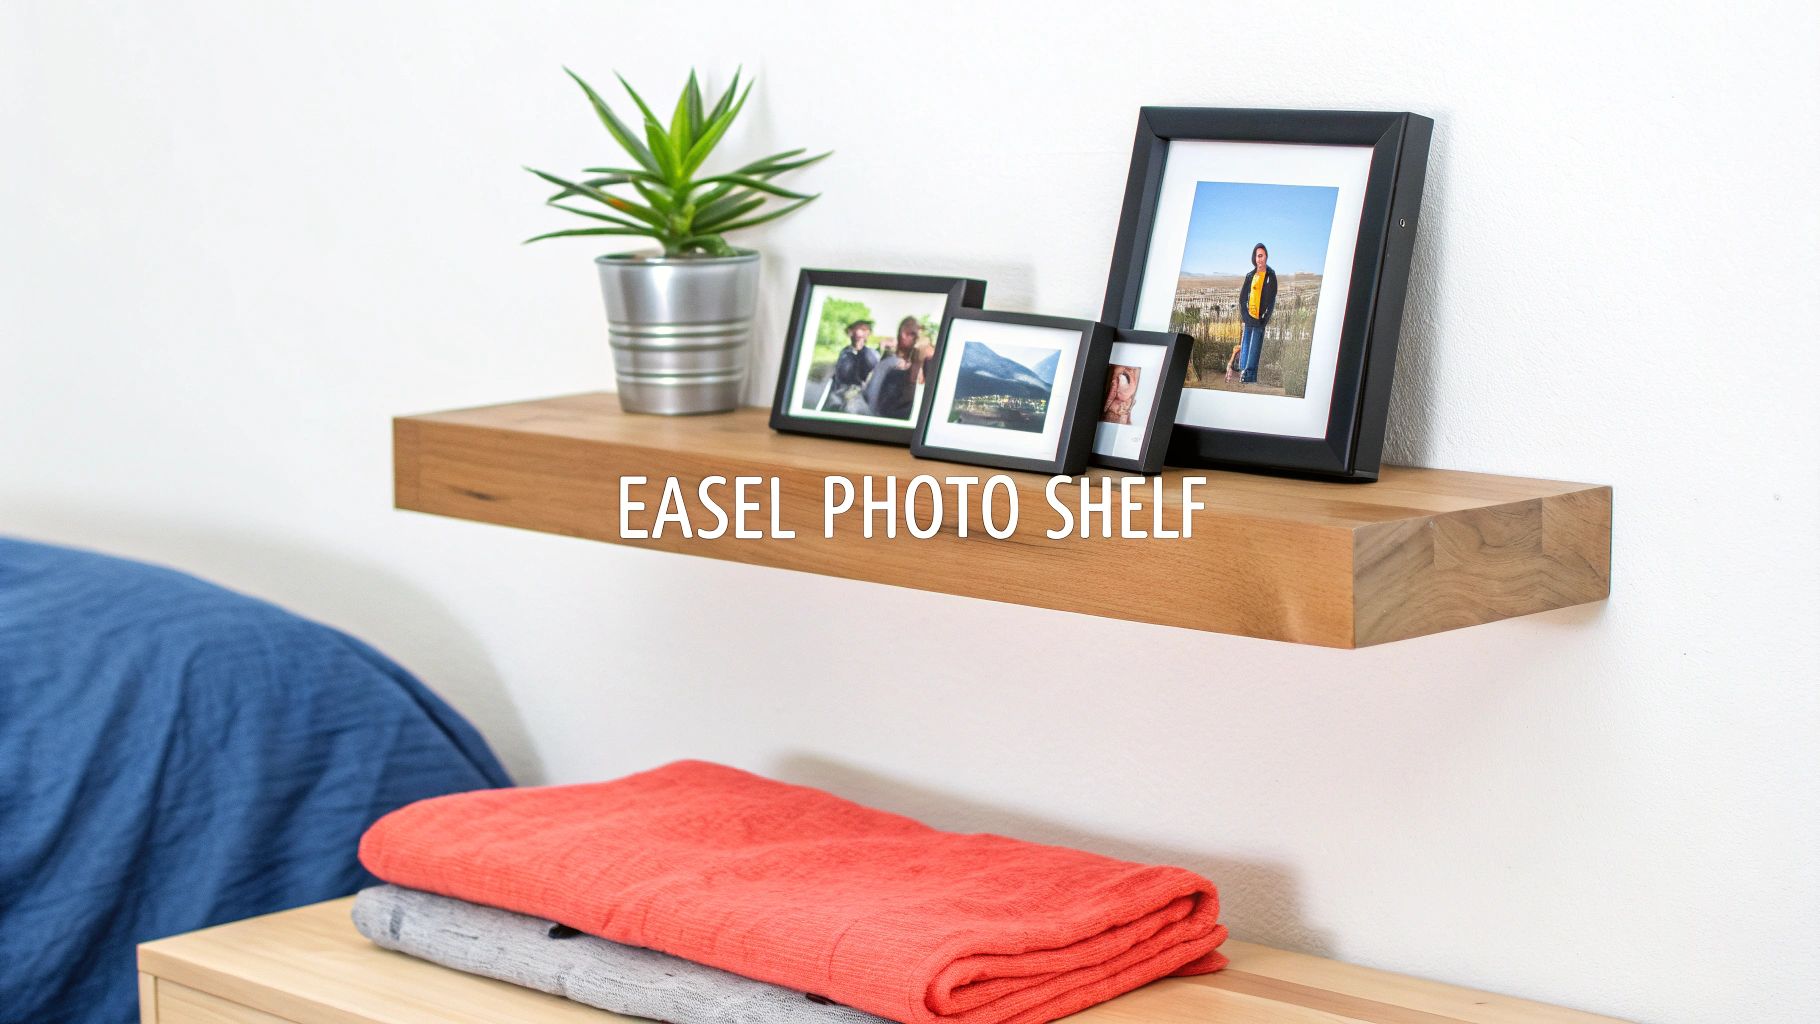
This elegant display is perfect for living rooms, hallways, and nurseries where you want to highlight special moments, such as a wedding or a new baby. You can coordinate the photo themes with other personalized decor, like a Custom Photo Blanket featuring a collage of the same milestones, creating a cohesive and heartwarming design narrative. It’s also an excellent gift idea, especially for Mother’s Day, letting Mom easily feature her most treasured family snapshots.
How to Create Your Shelf Display
- Gather Materials: You'll need floating shelves (wood, metal, or acrylic), small decorative easels (brass or clear acrylic work well), your chosen photos, and any small decorative objects like plants or candles.
- Plan Your Layout: Arrange the photos and objects on the shelf before mounting it. Mix vertical and horizontal prints and vary the heights of the easels to add visual interest.
- Install and Display: Securely mount the floating shelves according to the manufacturer's instructions. Arrange your easel-propped photos and accent pieces to complete the look.
This is one of the most creative ways to display photos without frames because it feels intentional and artful. Rotating photos seasonally or for special occasions keeps the display feeling fresh and dynamic, ensuring your home decor always reflects your family's latest adventures.
3. Photo Garland and String Lights
A photo garland combined with string lights is a wonderfully festive and flexible way to display photos without frames, instantly adding warmth and a personalized glow to any space. This method involves stretching twine, wire, or a decorative string across a wall and attaching photos with mini clothespins. Weaving LED string lights throughout the garland creates a cozy, ambient display that highlights your favorite memories.
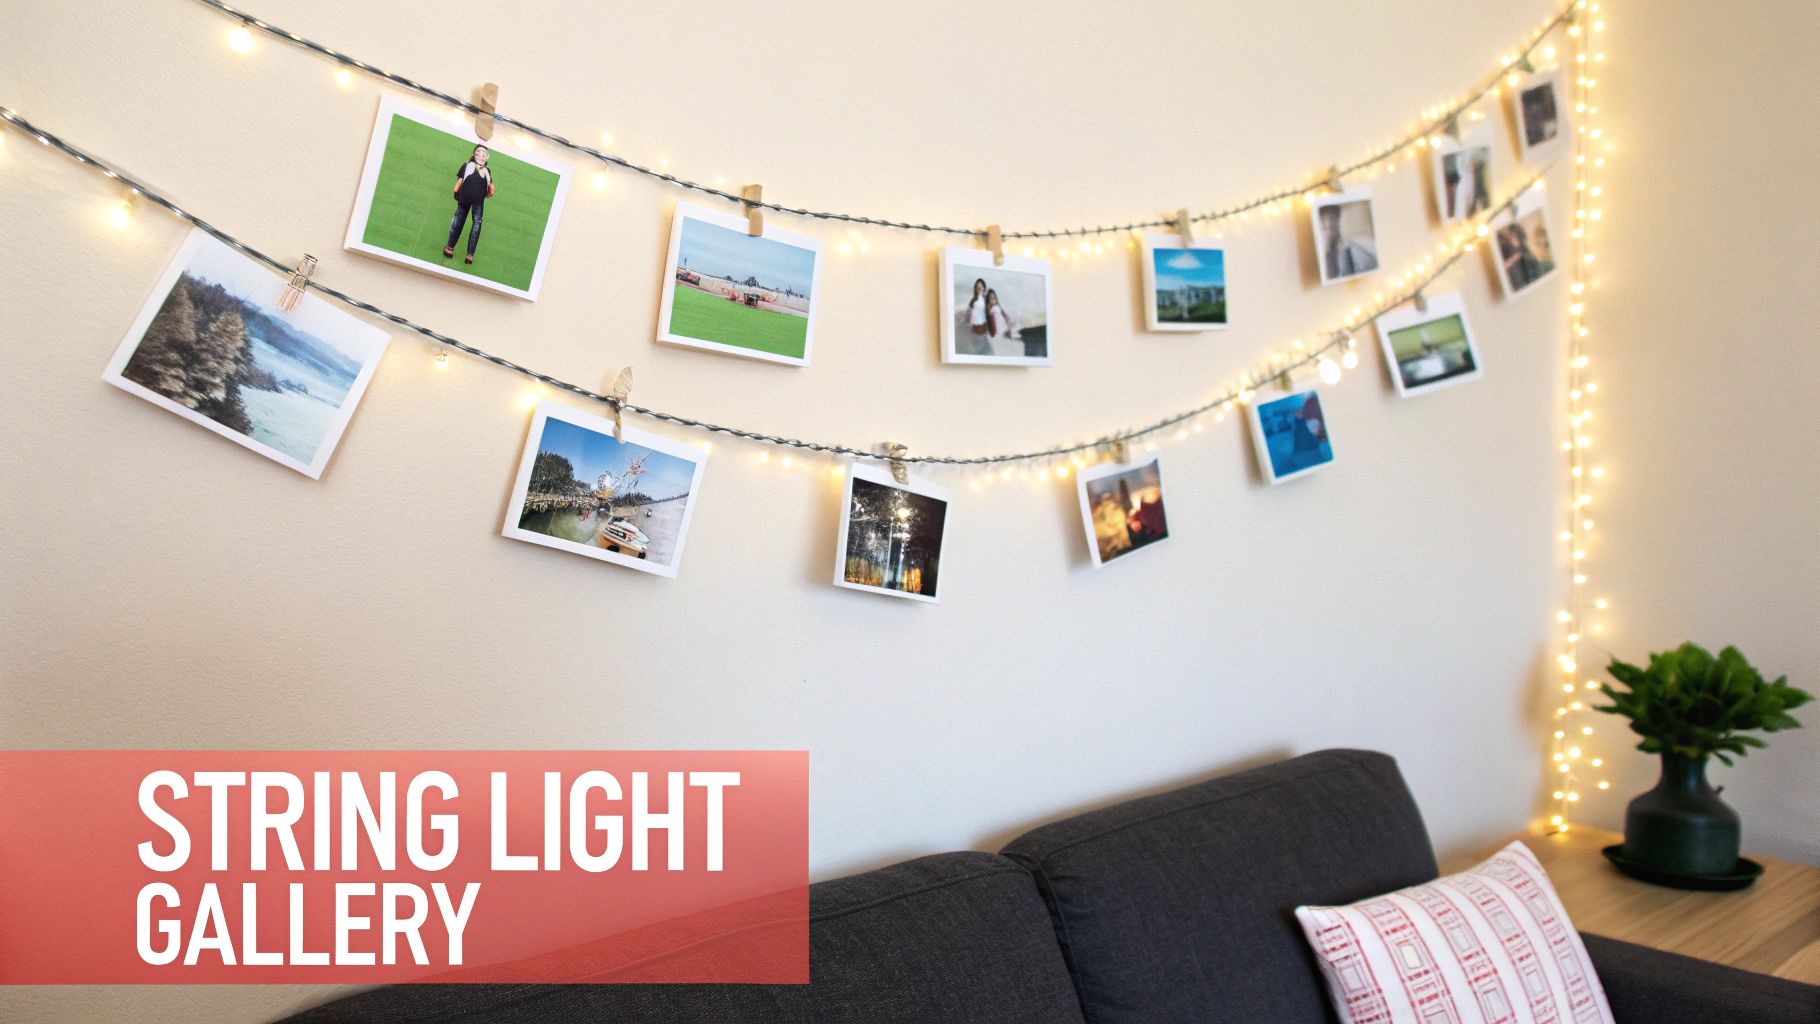
This whimsical approach is perfect for dorm rooms, bedrooms, or nurseries, offering a dimensional and easily updated showcase. For a truly cohesive look, you can drape a Custom Photo Blanket on a nearby chair or bed, pulling the warm, personal theme together. It’s also a fantastic idea for decorating event spaces like wedding receptions or milestone birthday parties.
How to Create Your Photo Garland
- Gather Materials: You'll need string or twine, mini clothespins, your chosen photos (printing on cardstock helps them hang better), small nails or command hooks, and a set of LED string lights (warm-toned lights create a cozier feel).
- Plan Your Layout: Decide where you want to hang the garland. You can stretch it straight across a wall, drape it in gentle scallops, or arrange it in a zigzag pattern for a more dynamic effect.
- Install and Display: Secure the string to the wall using hooks or nails, ensuring it's taut enough to hold the photos without significant sagging. Weave the string lights around the twine, then clip your photos along its length.
This method offers a simple yet impactful way to showcase memories. For added visual interest, try arranging your photos to create a color gradient or to tell a chronological story, making it a living piece of art in your home.
4. Magnetic Display Boards and Metal Walls
One of the most versatile and creative ways to display photos without frames is by using magnetic surfaces. This modern technique involves magnetic paint, sheet metal, or dedicated boards where you can attach photos using decorative magnets. The result is a dynamic, damage-free display that allows you to rearrange and update your favorite memories in seconds.
This approach is perfect for spaces that evolve, such as kitchens, home offices, and kids' bedrooms. It allows families to easily rotate seasonal photos or showcase new artwork without committing to permanent fixtures. A magnetic wall becomes an interactive canvas for your life's moments, blending function with personal style.
The clean, seamless look is especially appealing in contemporary interiors. To add warmth and texture to the space, consider pairing the cool metallic surface with a cozy, personalized Custom Photo Blanket draped over a nearby chair or sofa.
How to Create Your Magnetic Display
- Gather Materials: You will need a magnetic surface (a metal board, a wall coated with magnetic primer, or even a refrigerator), decorative magnets, and your chosen photos. For a cleaner look, you can print your photos directly onto magnetic-backed paper.
- Plan Your Layout: Arrange photos on your magnetic surface in a grid for a structured feel or in overlapping clusters for a more organic, scrapbook-style collage.
- Style and Display: Use strong, high-quality magnets to secure your prints. Choose a consistent color scheme or style for the magnets to create a unified aesthetic that complements your room's decor.
5. Washi Tape Photo Arrangement
A washi tape photo arrangement is a playful and budget-friendly way to display photos without frames, using decorative Japanese tape to create colorful borders directly on the wall. This technique allows for complete creative freedom, letting you design geometric patterns, simple "frames," or whimsical accents around your favorite pictures. The result is a vibrant, personalized display that is easy to install and damage-free, making it perfect for renters, dorm rooms, or children's bedrooms.
This method’s charm lies in its simplicity and versatility. You can easily update the look by changing the tape or swapping out photos, making it ideal for a growing gallery wall. It’s a fantastic way to bring personality to a space, especially when you coordinate the tape colors with other decor items, like a Custom Photo Blanket featuring a matching color palette. This creates a cohesive and thoughtfully designed atmosphere.
How to Create Your Washi Tape Display
- Gather Materials: You will need your chosen photos, various rolls of washi tape in complementary colors and patterns, a ruler, and scissors or a craft knife for clean lines.
- Plan Your Layout: Lightly tape your photos to the wall with a temporary adhesive to finalize their positions. Use a pencil to mark faint guidelines for your tape frames to ensure they are straight.
- Apply and Customize: Carefully apply the washi tape around each photo, creating a border. Feel free to layer different widths and patterns to add dimension and visual interest to your unique photo wall.
This approach is one of the most accessible and creative ways to display photos without frames, offering endless possibilities for customization. It's a particularly wonderful project for a teen's room or a creative home office, allowing for frequent updates that reflect changing tastes and new memories.
6. Polaroid-Style Photo Wall with Photo Booth Prints
A Polaroid-style photo wall is one of the most nostalgic and creative ways to display photos without frames, capturing a spontaneous, lived-in feel. This approach involves arranging instant-style prints, like Polaroids or photo booth strips, directly onto a wall in casual, overlapping patterns. The result is a dynamic and personal memory wall that celebrates candid moments and cherished relationships.
This method is incredibly popular in bedrooms, dorm rooms, and creative spaces, offering an affordable way to document friendships, travels, and special events. It brings a youthful energy to any room and can be beautifully complemented by a Custom Photo Blanket, which can feature a collage of the very same candid moments for a cohesive storytelling theme.
How to Create Your Polaroid-Style Wall
- Gather Materials: You will need your collection of instant photos or photo booth strips, along with a gentle adhesive like removable poster putty, washi tape, or low-tack painter's tape to protect your walls.
- Plan Your Layout: Decide whether you want a scattered, overlapping look or a more structured grid. You can create shapes like a heart or simply build the collection organically over time.
- Install and Display: Start by placing a few key photos to anchor your display, then build outwards. Overlap photos intentionally to create depth and a dynamic, layered appearance.
This frame-free approach is perfect for renters and anyone who loves to frequently update their decor with new memories. For more tips on showcasing your favorite snapshots, you can explore additional creative ways to display photos that celebrate life's impromptu moments.
7. Wire Grid and Photo Clips Display
A wire grid display is one of the most versatile and creative ways to display photos without frames, bringing a touch of industrial-chic to any space. This method uses a wall-mounted metal grid, often seen in modern offices or retail spaces, to create a dynamic and easily updatable photo wall. By attaching your favorite prints with decorative clips, you can create a functional and stylish focal point.
This modern aesthetic is perfect for home offices, dorm rooms, or kitchens, allowing you to easily swap photos, notes, and inspiration. It combines organization with personal expression, and pairing it with a cozy Custom Photo Blanket on a nearby chair can soften the industrial look with a personal, sentimental touch, especially as a thoughtful gift for Mother's Day.
How to Create Your Wire Grid Display
- Gather Materials: You will need a metal wall grid (available in black, white, gold, or rose gold), wall hooks or screws for mounting, decorative clips (like mini clothespins or metal binder clips), and your chosen photos.
- Plan Your Layout: Decide where the grid will have the most impact. Before hanging it, lay your photos on the grid to plan your arrangement. Consider a structured pattern or a more organic, scattered look.
- Install and Display: Mount the grid securely to the wall. Use your clips to attach photos, mixing in different sizes and orientations for visual interest. The grid also works well for holding small memorabilia.
The beauty of this system is its flexibility, making it an excellent choice for anyone who loves to frequently refresh their decor with new memories. It’s a clean, contemporary alternative to traditional frames.
8. Photo Ledge Shelving Display
A photo ledge shelving display is a sophisticated and highly versatile way to showcase your favorite memories, offering a sleek gallery-like feel without the need for traditional frames. These narrow shelves are designed for photos to lean against the wall, creating an effortlessly stylish arrangement that can be easily updated. This method allows you to layer prints of different sizes, mixing both framed and unframed images for a dynamic, curated look.
This approach is perfect for living rooms, hallways, or above a headboard in a bedroom, where it adds a modern architectural element. Its clean lines provide a structured yet informal stage for your photos. You can complement the display by draping a Custom Photo Blanket over a nearby armchair, echoing the personal memories featured on the shelves and creating a cohesive, heartfelt atmosphere.
How to Create Your Ledge Display
- Gather Materials: You will need photo ledge shelves (available in various lengths and finishes), a level, a drill, screws, wall anchors, and your collection of photos.
- Plan Your Layout: Arrange the shelves on the wall using painter's tape to visualize the spacing and height before drilling. Consider a single long ledge or a stacked arrangement of multiple shorter ones.
- Install and Display: Use a level to ensure the shelves are perfectly straight. Once installed, start arranging your photos, layering larger prints at the back and smaller ones in front to create depth.
For an even more enclosed and elegant presentation of your treasured items, you can explore creative glass wall cabinet display ideas that protect and highlight your memories. This makes the ledge display an ideal gift, especially for occasions like Mother’s Day, as it provides a beautiful, evolving gallery for Mom to showcase her most cherished family moments.
9. Cork Board or Linen Panels with Decorative Pins
Using a cork board or linen-covered panel is one of the most tactile and creative ways to display photos without frames, transforming a simple bulletin board into a sophisticated piece of wall art. This method involves mounting a soft, textured backing board (like cork, linen, or burlap) and securing your favorite photos with decorative pins. The result is a highly personalized and easily adaptable display that adds warmth and texture to any room.
This idea is perfect for home offices, creative studios, or children's rooms, where you can cluster inspiration and cherished memories together. It allows for endless customization as you can easily swap out prints, ticket stubs, and notes. For a cohesive look, consider draping a Custom Photo Blanket featuring corresponding family photos over a nearby chair to reinforce the memory theme.
How to Create Your Pinned Photo Display
- Gather Materials: You will need a cork board or a foam panel wrapped in your chosen fabric (linen, burlap, felt), decorative pins (like gold map pins or unique pushpins), and your photo prints in various sizes.
- Plan Your Layout: Arrange your photos on the board before pinning them to find a composition you love. Create a visual hierarchy by grouping related images or using larger prints as focal points.
- Mount and Decorate: Secure the board to the wall. Begin pinning your photos, paying attention to spacing and balance. Don't be afraid to overlap images slightly for a layered, scrapbook effect.
This approach is especially popular for event displays, such as at a wedding reception. You can explore more ideas on how to display your cherished wedding photos to keep those special memories alive. This versatile display method makes for a beautiful and ever-changing collection of your favorite moments.
10. Wooden Ladder or Pegboard Display
Repurposing a wooden ladder or a versatile pegboard offers a charming and creative way to display photos without frames. This method maximizes vertical space with a rustic yet modern aesthetic, perfect for leaning against a wall or mounting as a functional art piece. It allows you to hang photos using clips, hooks, or twine, creating a display that feels both organized and effortlessly casual.
This display style is incredibly popular in farmhouse, boho, and industrial interiors, bringing warmth and personality to any room. It’s a fantastic way to showcase a collection of memories, and it pairs beautifully with other cozy elements. Imagine a Custom Photo Blanket featuring a favorite family portrait draped over a nearby chair, echoing the personalized feel of the ladder display.
How to Create Your Ladder or Pegboard Display
- Gather Materials: You will need a decorative wooden ladder or a pegboard, small clips (like clothespins) or hooks, twine (optional), and your favorite photo prints.
- Secure Your Base: Ensure the ladder is stable and securely positioned against the wall. If using a pegboard, mount it firmly according to the manufacturer’s instructions.
- Arrange and Hang: Clip your photos directly onto the ladder rungs or use hooks on the pegboard. You can also string twine between the rungs to hang more images. Create visual balance by spacing photos evenly and mixing in other elements like greenery or small fairy lights for a layered look.
This approach is perfect for living rooms or bedrooms, adding a unique, DIY touch to your decor. It’s also an excellent idea for a unique Mother’s Day gift, allowing Mom a beautiful and easily updateable way to showcase her most cherished family photos.
10 Creative Frame-Free Photo Displays Compared
| Display Method | Implementation Complexity 🔄 | Resource & Cost ⚡ | Expected Outcomes ⭐ / Impact 📊 | Ideal Use Cases 💡 |
|---|---|---|---|---|
| Photo Collage Wall with Clipboards and String | 🔄🔄 | ⚡ | ⭐⭐⭐ · Personal, changeable gallery 📊 Easy photo rotation, low cost | Renters, family rooms, seasonal displays |
| Floating Shelves with Easel-Propped Photos | 🔄🔄🔄 | ⚡⚡ | ⭐⭐⭐⭐ · Curated, gallery-quality display 📊 Polished look with added storage | Bedrooms, nurseries, styled living spaces |
| Photo Garland and String Lights | 🔄 | ⚡ | ⭐⭐⭐ · Warm, atmospheric display 📊 High visual/Instagram appeal | Dorms, kids' rooms, events, cozy corners |
| Magnetic Display Boards and Metal Walls | 🔄🔄🔄 | ⚡⚡⚡ | ⭐⭐⭐⭐ · Highly flexible, durable 📊 Fast updates without wall damage | Kitchens, home offices, high-change families |
| Washi Tape Photo Arrangement | 🔄 | ⚡ | ⭐⭐⭐ · Colorful, customizable display 📊 Cheap and removable creative option | Kids' rooms, dorms, DIY-focused spaces |
| Polaroid-Style Photo Wall with Photo Booth Prints | 🔄 | ⚡⚡ | ⭐⭐⭐ · Nostalgic, candid impact 📊 Emotionally resonant but higher photo cost | Youth bedrooms, events, casual memory walls |
| Wire Grid and Photo Clips Display | 🔄🔄🔄 | ⚡⚡ | ⭐⭐⭐⭐ · Durable, modular display 📊 Supports mixed media and heavier items | Industrial lofts, offices, modern homes |
| Photo Ledge Shelving Display | 🔄🔄🔄 | ⚡⚡ | ⭐⭐⭐⭐ · Gallery-like, elegant presentation 📊 Secure for framed/unframed prints | Hallways, living rooms, formal gallery walls |
| Cork Board or Linen Panels with Decorative Pins | 🔄🔄 | ⚡⚡ | ⭐⭐⭐ · Textured, tactile display 📊 Easy repositioning and personalization | Home offices, family command centers, craft rooms |
| Wooden Ladder or Pegboard Display | 🔄🔄 | ⚡⚡ | ⭐⭐⭐ · Vertical, rustic/boho display 📊 Unique focal point, space-efficient | Farmhouse/boho interiors, small vertical spaces |
Wrap Your Home in Memories: From Walls to Warmth
As we've explored, moving beyond the traditional picture frame isn't just about finding a new way to hang a photo; it's about fundamentally rethinking how your memories interact with your living space. The journey from a simple print to a dynamic, frameless display transforms your home into a living gallery of your most treasured moments. By stepping away from the glass and wood confines of a standard frame, you unlock a universe of texture, dimension, and personal expression that breathes new life into your walls and surfaces.
The creative ways to display photos without frames we’ve detailed, from rustic wooden ladder displays to whimsical washi tape arrangements, all share a common thread: they make your memories an active, engaging part of your home’s story. You're no longer just looking at a picture; you're experiencing a memory woven into the fabric of your daily life. This approach invites interaction, sparks conversation, and turns static images into a dynamic narrative that evolves with your family.
Key Takeaways for Your Frameless Photo Journey
To truly master the art of frameless displays, remember these core principles:
- Embrace Texture and Dimension: Combine different materials like metal grids, natural wood, soft textiles, and delicate string lights. This adds depth and visual interest that a flat, framed photo simply cannot achieve.
- Prioritize Personalization: The most impactful displays are those that reflect your unique style. Whether you prefer a minimalist, organized grid or a free-flowing, eclectic garland, let your personality guide your design choices.
- Think Beyond the Wall: Your memories can live anywhere. Consider how photos can be integrated into functional items, turning everyday objects into cherished keepsakes that offer both comfort and connection.
Your Next Creative Step
The ultimate goal is to create a home that feels uniquely yours, filled with love and warmth. These frameless photo ideas are your toolkit for achieving that. Start small with a single project, perhaps a simple clipboard collage or a magnetic display board in your kitchen. As you gain confidence, you can tackle a larger installation, like a full photo ledge system in your living room.
The real magic happens when you extend this concept of "living memories" from your walls to the very items you use every day. Imagine your favorite family portrait or a collage of your child's first year not just hanging on a wall, but wrapping you in a cozy embrace. This is where functional art meets heartfelt sentiment, creating the ultimate personalized decor. Whether you are searching for a one-of-a-kind holiday gift that will be treasured for years or the perfect, heartfelt present for Mother's Day, transforming your photos into a tangible source of comfort is an unforgettable gesture. Your home is a canvas, and your memories are the masterpiece. It's time to display them with the creativity and love they deserve.
Ready to take your favorite photos off the wall and into your arms? At That Blanket Co, we transform your cherished memories into beautiful, ultra-soft custom photo blankets and pillows, creating the perfect functional keepsake for your home or a heartfelt gift for someone you love. Explore the possibilities and start designing your unique piece today at That Blanket Co.