


Make a Blanket with Pictures: A Guide for Holiday & Mother's Day Gifting
Ready to turn those pictures on your phone into a warm, huggable keepsake? You’ve got two great ways to do it: you can roll up your sleeves for a hands-on DIY project, or you can design a high-quality, professional Custom Photo Blanket online. Either way, you'll end up with a beautiful, personalized treasure perfect for any occasion.
Bringing Your Favorite Photos to Life on a Blanket
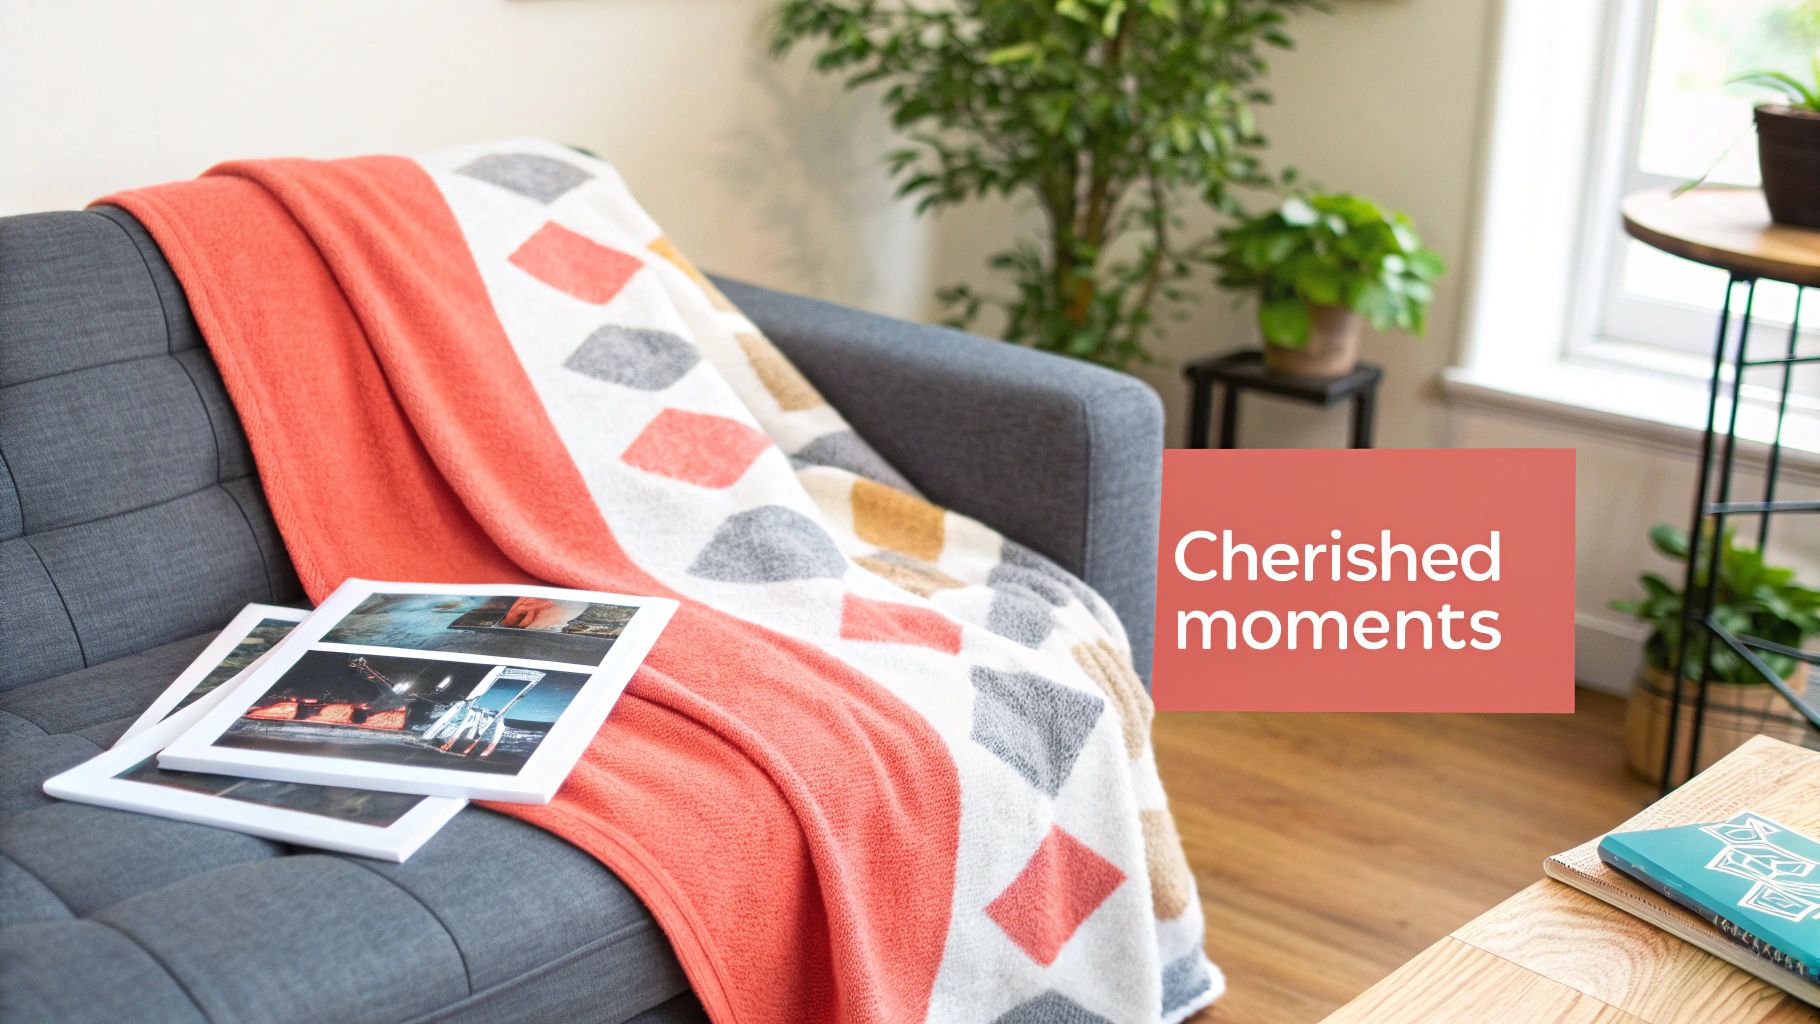 There's something truly special about wrapping yourself in a blanket covered with your favorite people, places, and moments. It's more than just a cozy layer—it's like getting a warm hug from your best memories.
Whether you're a crafting pro or just looking for a simple way to create something beautiful, making a photo blanket is a deeply rewarding process. This guide will walk you through both paths. We'll explore the satisfying journey of a do-it-yourself project and also show you how easy it is to create a professional custom photo blanket. Each has its own perks, and the right choice really just depends on what you’re looking for.
Why Photo Blankets Make Perfect Gifts
Photo blankets have become the go-to gift for a reason. They take all those digital photos—often just sitting on phones and hard drives—and turn them into something functional, sentimental, and genuinely heartwarming.
It’s part of a bigger shift toward personalized, comfort-focused gifts. The global blanket market, which was valued at around USD 9.73 billion, is expected to keep growing as more of us look for items that feel personal and cozy. This makes them a fantastic choice for big life events and holidays:
- Holiday Gifting: Come November and December, a blanket filled with a year's worth of family moments is an incredibly thoughtful gift for Christmas or Hanukkah.
- Mother's Day: For moms in April and May, a blanket covered in family portraits or snapshots of the grandkids is a gift that will be treasured forever.
- Anniversaries & Milestones: Commemorate a wedding, graduation, or that unforgettable vacation with a curated collection of photos.
- New Baby Celebrations: A soft blanket with newborn photos or sweet family pictures becomes an instant heirloom.
A photo blanket does more than just keep you warm—it tells a story. Each image is a chapter, and together they create a narrative of love, laughter, and cherished moments that you can revisit every time you get cozy.
The real magic is in how you arrange the images. A well-designed layout can turn a simple collection of pictures into a cohesive piece of art. For tips on arranging multiple images, check out our guide on how to create a photo collage for maximum visual impact. And if you're looking for other unique ways to showcase your favorite memories, you can even explore creating custom books with photos.
The DIY Path: Crafting a Photo Blanket at Home
For the crafty folks who love putting a personal spin on things, making a photo blanket at home can be an incredibly rewarding project. Taking the DIY route means you get to call all the shots—from the feel of the fabric to the exact placement of each picture. It's the perfect way to turn a weekend into a creative adventure and end up with a keepsake that’s truly one-of-a-kind.
Your journey starts with choosing your canvas: the fabric itself. This decision is a big one, as it shapes the final look, feel, and durability of your blanket. Think about who it’s for and how it’ll be used, because each material offers a completely different vibe.
Selecting the Right Fabric and Transfer Method
When it comes to fabric, your two main contenders are cozy fleece and classic quilt cotton. Fleece is unbelievably soft, forgiving for beginners, and fantastic for a simple, no-sew design where you just tie the edges. Quilt cotton, on the other hand, is the go-to for a more structured, multi-panel blanket that requires sewing, giving your photos a crisp, clean surface.
With your fabric picked out, it's time to get your photos onto it. You’ve got two solid techniques to choose from:
- Iron-On Transfer Paper: This is by far the most accessible method. You just print your photos onto special transfer paper with a standard inkjet printer, then use a hot iron to press them onto the fabric. It’s a straightforward approach that works really well for smaller projects or individual photo squares.
- Direct Fabric Printing Services: If you're aiming for a more professional and durable finish, you can use a service that prints your photos directly onto large sheets of fabric. You upload your digital files, they mail you the printed material, and you can then sew it into your blanket.
The history of blankets is a story of innovation, from animal hides to woven textiles. Today, photo blankets are a modern chapter in that story, blending ancient craft with new technology to let us wear our memories. You can find more about this cultural evolution and the history of blankets on hrms.pau.edu.ng.
Preparing and Assembling Your Creation
Getting your photos ready is absolutely key if you want to avoid faded or blurry results. Always, always use high-resolution images. It’s also a good pro tip to slightly bump up the brightness and contrast before printing, as colors can sometimes look a bit darker once they’re on fabric.
If you’re going with iron-on transfers, follow the package instructions to the letter. Uneven heat or pressure is a recipe for peeling corners. For a quilted blanket, precision is your friend—cut your fabric squares carefully and use a consistent seam allowance for a clean, grid-like finish. A no-sew fleece blanket is much simpler: just lay two pieces of fleece together, cut a fringe around the edges, and start tying.
Remember, the goal of a DIY project is not perfection but personality. A slightly imperfect, handmade blanket often carries more sentimental value than a flawless one because it was made with love and effort.
While the DIY route is super fulfilling, it does take time and the right materials. If you find yourself short on either, designing Custom Photo Blankets online is a fantastic alternative that delivers professional quality without the hassle. Need some design ideas? Check out these 15 creative custom blanket ideas for inspiration. And if you just love hands-on projects, exploring this complete DIY guide for sensory bottles might spark even more crafting creativity.
Designing a Professional Custom Photo Blanket
If you're after that stunning, high-quality finish but don't have the time or energy for a DIY project, ordering a Custom Photo Blanket online is the perfect solution. It’s the best way to make a blanket with pictures that looks completely polished and feels incredibly luxurious. This approach puts you in the designer's seat, letting you create a professional-grade keepsake with just a few clicks.
It all starts with getting your photos ready. The quality of your images has a huge impact on the final product, so a little prep work here will absolutely pay off in the end.
Preparing Your Photos for Printing
For your pictures to really pop with vibrant color and sharp detail, they need to be high-resolution. Think of it this way: a low-res photo is like a small sketch that gets blurry and pixelated when you try to stretch it across a huge canvas. You’ll want to use the original, full-size image files straight from your camera or smartphone. Aim for at least 150-300 DPI (dots per inch) for the best results.
Definitely avoid using photos you’ve saved from social media or that have been sent through messaging apps. These platforms almost always compress images to save space, which tanks their quality and makes them totally unsuitable for printing on a large blanket.
- Pick Bright, Clear Images: Photos with good lighting and clear subjects always translate best onto fabric. Dark or shadowy images tend to lose their detail in the printing process.
- Crop with Purpose: Cropping is your friend! It helps you focus on the most important part of the picture. Cut out any distracting backgrounds to draw everyone’s attention to those smiling faces or a beautiful landscape.
- Check the Color Balance: Take a quick look to make sure the colors in your photos look natural. Sometimes, a simple auto-correct in a photo editing app is all it takes to get them just right.
The journey of creating a photo blanket at home involves a few key stages, from picking your materials to the final assembly.
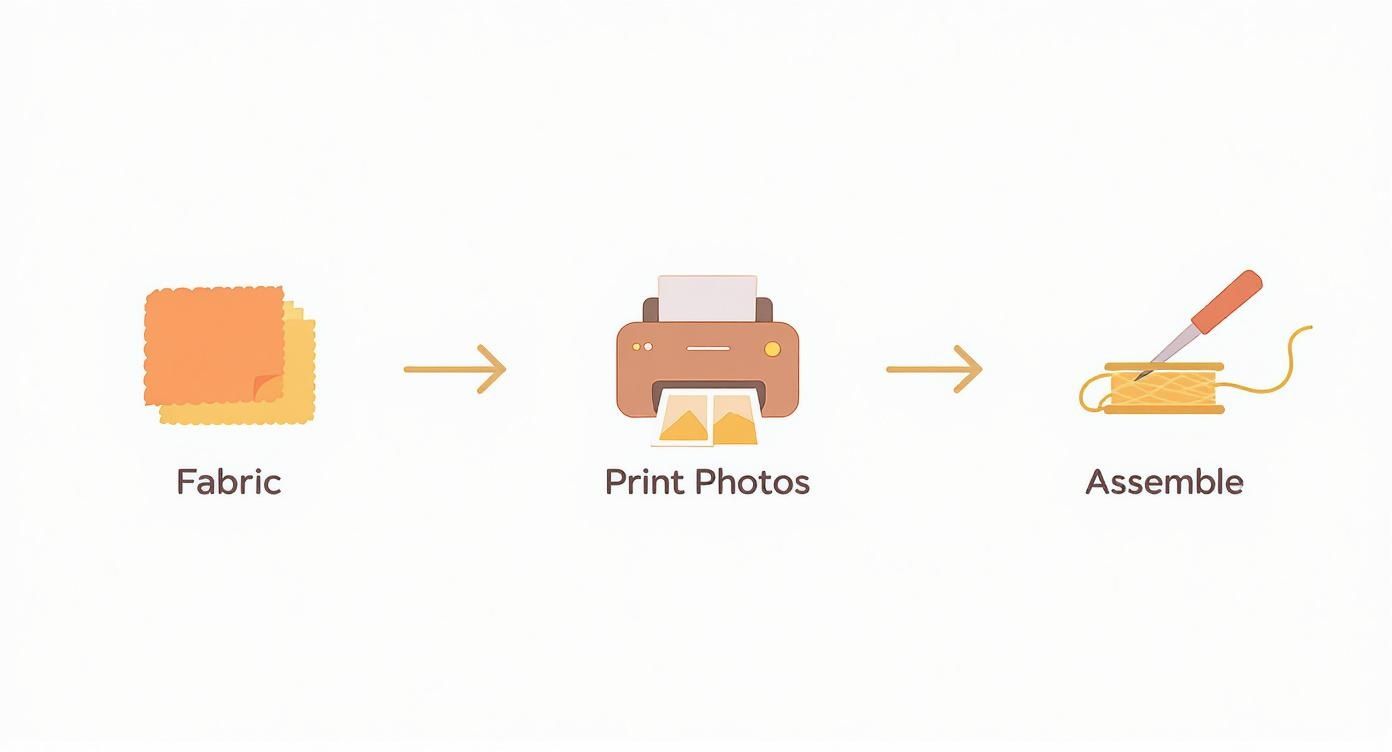
This visual breaks down the core steps for a DIY project: choosing your fabric, printing the images, and then sewing it all together.
Choosing Your Layout and Fabric
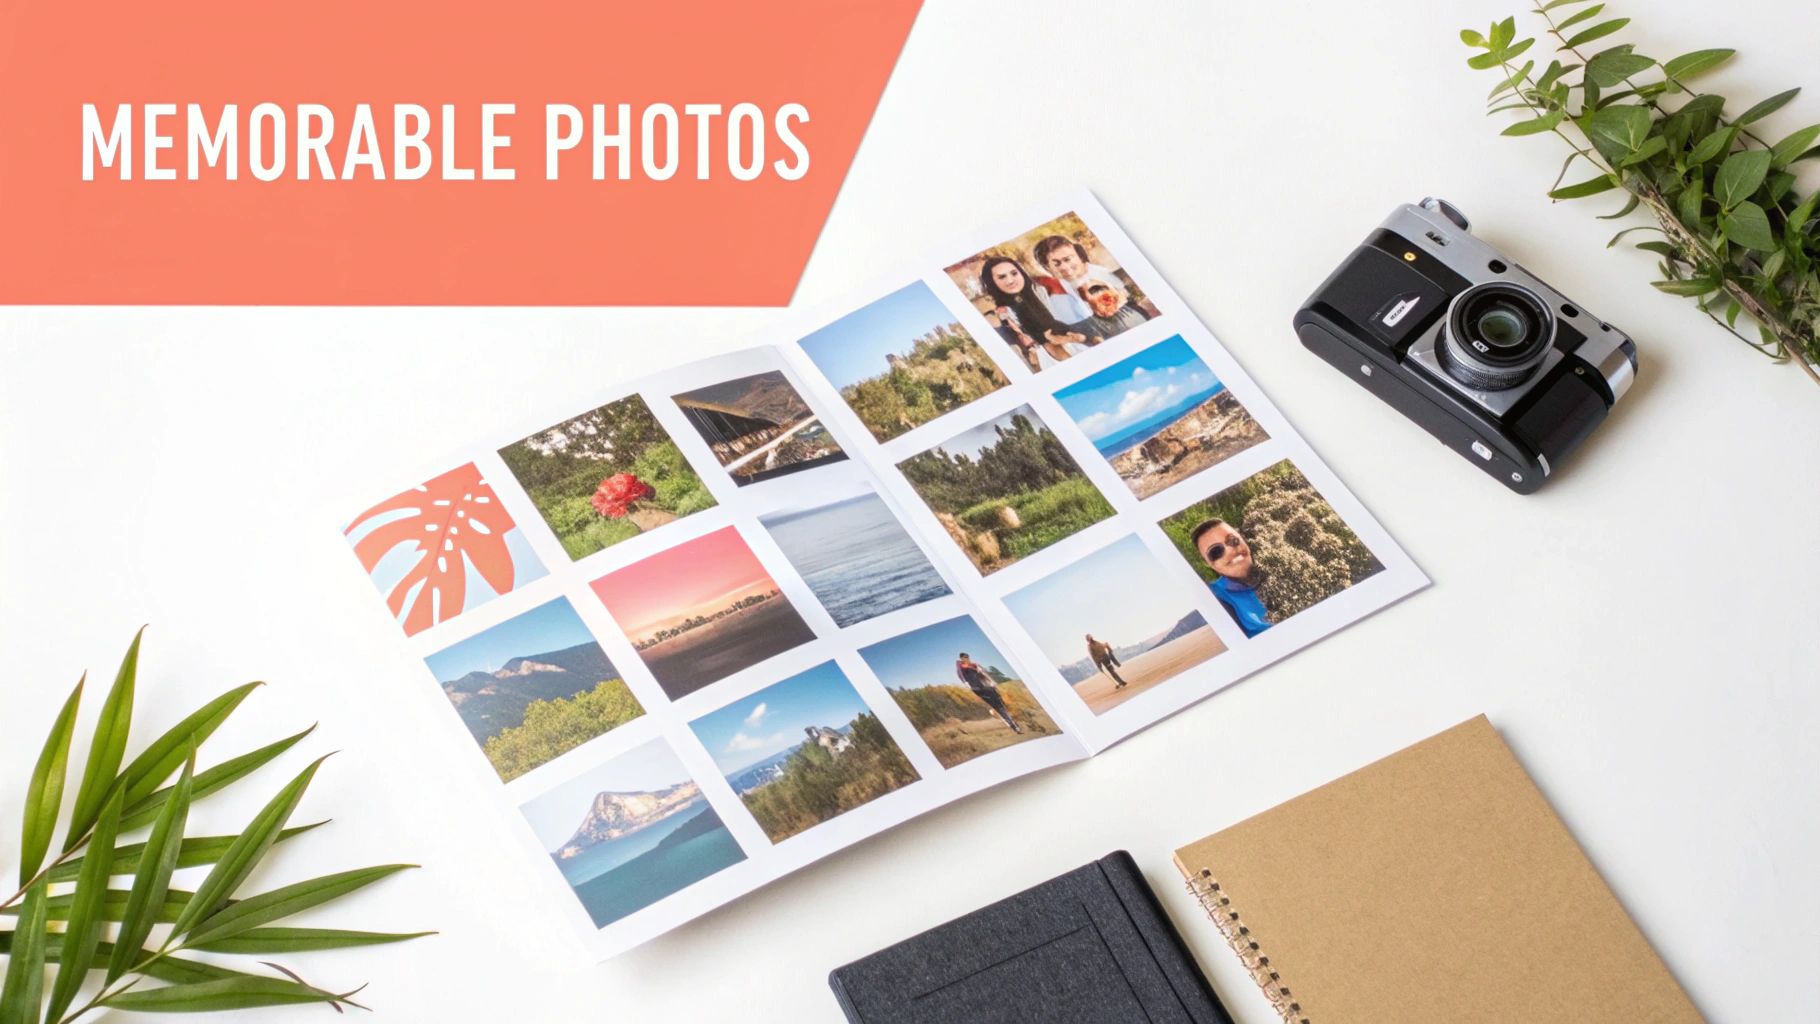
Once your photos are prepped and ready, the fun part begins. You can choose from several design layouts to tell your story in the most compelling way. A classic collage is perfect for showcasing a whole collection of memories—like a year in review, a family vacation, or a baby's first milestones. On the other hand, a single, powerful image can make a bold and beautiful statement all on its own.
Just as important as the design is the material you choose. The fabric is what determines the blanket's look, feel, and how warm it will be.
The rise of personalized photo blankets is a direct reflection of what people want: products that blend an emotional connection with stylish home decor. It's a market that's really driven by both sentiment and style.
The broader plush blanket market, which is often used for these custom designs, was valued at around USD 516.5 million and is expected to grow quite a bit. This trend just highlights how much people value turning their personal pictures into functional, beautiful items. You can explore the plush blanket market insights on futuremarketinsights.com for more details.
Two of the most popular fabric options offer very different experiences:
- Plush Fleece: This is a fan favorite for good reason. It’s incredibly soft, durable, and shows off colors beautifully. It’s also lightweight yet warm, making it a versatile choice for year-round comfort.
- Luxurious Sherpa: For an extra layer of warmth and a truly premium feel, sherpa is an amazing option. It typically has a smooth, printable fleece side and a fluffy, wool-like sherpa backing that is exceptionally cozy.
Choosing Photos for a Truly Memorable Blanket
The real magic of making a blanket with pictures isn't just about the cozy fabric. It’s about the story your images tell. When you curate the right collection of photos, you’re turning a simple comfort item into a powerful narrative of love, laughter, and your most treasured moments. A thoughtful theme is the perfect place to start.
This is especially true for gifts. For Mother's Day, you could gather photos from different generations to create a visual family tree. For the holidays in November and December, a collection of the year's best moments—from summer vacations to school plays—beautifully captures the spirit of the past twelve months.
Curating a Cohesive Theme
A strong theme is what turns a random assortment of pictures into a purposeful collection, guiding your photo selection and ensuring the final blanket looks harmonious. Don't be afraid to get creative and specific here.
- A Year in Review: Gather snapshots from holidays, birthdays, and everyday moments for a perfect holiday gift in November or December.
- Mother's Day Special: Collect photos of Mom with her kids and grandkids through the years for a gift she'll cherish.
- Celebrating a Pet: Create a loving tribute to a furry family member with photos of them playing, sleeping, and just being their adorable self.
- Vacation Memories: Dedicate the blanket to a single unforgettable trip, capturing the landscapes, candid moments, and goofy group shots that made it so special.
This focused approach helps you select images that work beautifully together, telling one clear story.
Balancing Color, Composition, and Emotion
Once you have a theme, it's time to think like a designer and balance the visual elements for a stunning layout. Pay close attention to the colors in your photos. A mix of black-and-white images with a few pops of color can create a dramatic, artistic effect. On the other hand, choosing pictures with a similar color palette can result in a beautifully coordinated and serene design.
Composition matters, too. Mix close-up portraits with wider, scenic shots to add variety and keep the eye moving. A tight shot of a smiling face paired with a sprawling landscape creates a really dynamic flow.
Most importantly, go for photos that spark real emotion. A candid, laughing shot often tells a far more compelling story than a perfectly posed portrait ever could.
The most memorable Custom Photo Blankets are the ones that feel authentic. They capture real personalities and unfiltered joy, turning a collection of images into a tangible piece of your family's history.
For the sharpest, most vibrant results, always use high-resolution images. If you want to dive deeper into the technical side of things, our detailed guide on the best photo resolution for printing has you covered.
Adding text is another fantastic way to elevate your design. A name, an important date, or a short, meaningful quote provides context and adds another layer of personalization, turning your blanket into a true work of heart.
Caring for Your Blanket to Preserve Your Memories
You’ve created something special, a blanket that tells a story. Now, let's make sure it lasts. Proper care is what turns a fun project into a keepsake you can enjoy for years, whether it's a DIY masterpiece or a professionally printed blanket.
How you wash and dry your blanket directly impacts the vibrancy of the photos and the softness of the fabric. It’s the final, crucial step in making sure those memories stay bright.
For anyone who went the DIY route with iron-on transfers, this next part is for you. Before you do anything else, you have to set the ink. Grab your instructions for the transfer paper—they usually recommend a final press with a hot, dry iron. This one action bonds the image right into the fibers and is your best defense against cracking or peeling down the road.
Washing and Drying Your Photo Blanket
When wash day comes, a little prep goes a long way. If you can, turn your DIY blanket inside out. Better yet, pop it into a large mesh laundry bag. This simple trick minimizes friction on the printed surface, protecting all that hard work you put in.
Here are the go-to settings that work for both homemade and professionally made photo blankets:
- Washing: Always use a gentle cycle with cold water. Hot water is the number one enemy of printed fabrics, causing colors to fade and run over time. Stick with a mild, phosphate-free detergent.
- Drying: The absolute best method is to air-dry it. You can hang it up or lay it flat. If you’re in a hurry and need to use a machine, choose the lowest heat setting possible—think tumble dry low or an air-fluff cycle. High heat is a fast track to damaged fibers and degraded photo transfers.
Proper care is what transforms your photo blanket from a temporary craft project into a lasting heirloom. A few extra minutes spent on gentle washing and drying will protect your cherished memories for countless cozy moments to come.
To keep that brand-new softness and prevent pilling, try not to wash your blanket with abrasive items like jeans or heavy towels. When it’s not in use, store it in a cool, dry spot away from direct sunlight, which can cause fading. Follow these simple rules, and your blanket will look just as good as the day you finished it.
Common Questions About Making Photo Blankets
Jumping into the world of photo blankets usually brings up a few questions. Whether you're thinking about a weekend DIY project or designing a professional-quality keepsake, getting the right answers makes the whole process a lot more fun.
We get these questions all the time, so let's walk through them. From the nitty-gritty tech specs to creative choices, knowing these details will help you create something you’ll absolutely love.
What Is the Best Photo Resolution for a Blanket?
For those sharp, crystal-clear results you see in a gallery, your photos need to be high-resolution. The gold standard is 300 DPI (dots per inch) at the final size you want to print. This is the secret to making sure that when your image is enlarged to fit the fabric, it stays crisp and doesn't turn into a blurry, pixelated mess.
Always, always use the original, full-size image files straight from your camera or smartphone. It's so tempting to just grab a photo from social media, but those images are heavily compressed and will look fuzzy when they're blown up. A sharp image is the foundation of all great Custom Photo Blankets.
Can I Use Photos from My Smartphone?
Absolutely! Modern smartphones have incredible cameras that take high-quality pictures perfect for printing on a blanket. The key is to use the original image file—the one stored in your phone’s photo gallery.
Just be sure to avoid photos that have been sent through messaging apps or saved from social media. Those versions are shrunk down and lose a ton of quality, which means they won't look good when enlarged. Stick to the source file, and you'll be golden.
The most beautiful blankets start with the best images. Using the original, high-resolution file from your phone or camera is the single most important step you can take to ensure a professional, gallery-quality print that you'll be proud to display or gift.
What Fabric Is Best for a Photo Blanket?
The right fabric really comes down to the feel you're going for. Each material brings its own unique blend of softness, warmth, and print quality to the table.
- Fleece: This is hands-down the most popular choice. It's incredibly soft, surprisingly durable, and lightweight, and it makes colors pop with amazing vibrancy. It’s the perfect all-rounder for everyday use.
- Sherpa: If you're looking for an extra touch of luxury and warmth, sherpa is a fantastic upgrade. It gives you a smooth, printable fleece side for your photos and a fluffy, wool-like backing that is ridiculously cozy and inviting.
How Long Does It Take to Get a Custom Blanket?
For custom orders, production and shipping are usually quite fast—often just a few business days to create and send out your blanket. That said, planning ahead is always a good idea, especially if you're ordering for a time-sensitive gift.
During peak seasons like the holidays in November and December, or in the weeks leading up to Mother's Day in April and May, ordering a week or two in advance is a smart move. This gives you a nice cushion and ensures your thoughtful gift arrives with plenty of time to spare.
Ready to turn your cherished memories into a warm, cozy keepsake? Creating a beautiful, high-quality custom photo blanket that will be treasured for years is simple. Create your personalized blanket today!