


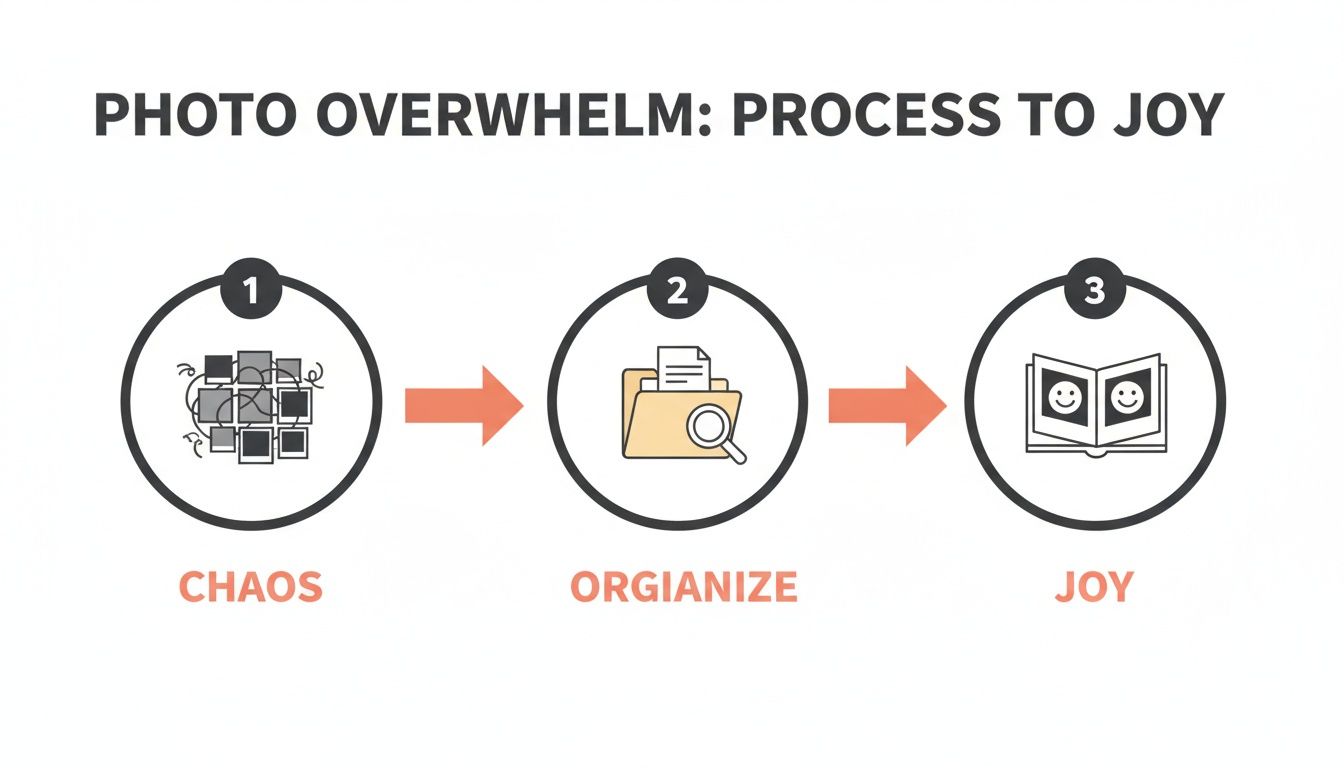
How to Organize Digital Photos and Reclaim Your Memories
Organizing your digital photos is about creating a system that works for you—think simple folders, getting rid of duplicates, adding a few keywords, and having a solid backup plan. It's how you turn that chaotic camera roll into a library of memories you can actually enjoy and find anything in seconds.
Confronting the Digital Chaos Why Organizing Matters
We’ve all been there. Staring at a camera roll with thousands of unsorted pictures, feeling completely overwhelmed. Every photo is a moment you wanted to save, but together they’ve become a digital mountain that feels impossible to climb. This isn't just about messy files; it's an emotional weight. The real cost of all that digital clutter is losing track of precious memories, the frustration of never finding that one perfect photo when you need it, and that quiet worry that your best moments are just one hard drive failure away from being gone forever.
It’s a task we all push off to "someday," but the problem is only getting bigger. It's estimated we'll be taking a mind-boggling amount of digital photos a year, and the vast majority of those will come from our smartphones. That’s tens of thousands of photos snapped every single second. Suddenly, managing our personal pictures isn't a small chore anymore; it’s a real challenge.
Reframe the Task as an Act of Curation
Instead of seeing this as a chore, try thinking of it as curating your life’s story. Each photo you decide to keep is a chapter, a character, or a key scene. When you clear out the noise—the blurry shots, the five nearly identical selfies, the screenshots of recipes you never made—you let the truly meaningful images stand out.
This isn't just about being tidy. It’s an act of self-care with some pretty great payoffs:
- Peace of Mind: Knowing your memories are safe, backed up, and easy to find just melts away a little bit of that low-grade stress we all carry.
- Rediscovered Joy: You will absolutely stumble upon forgotten moments and relive happy memories that were buried in the digital mess.
- Creative Freedom: An organized library makes it fun and easy to create beautiful projects, whether it's a family yearbook or just sharing memories online.
The goal isn't just to clean up your files. It's to build a personal archive that brings you joy and helps you connect with your past. You're turning a chaotic feed into a treasure trove of your most valuable moments.
From Clutter to Cherished Keepsakes
Ultimately, getting your digital photos in order unlocks their real potential. A well-curated collection is ready for sharing, enjoying, and turning into tangible keepsakes that celebrate your family's journey. With the holidays right around the corner, now is the perfect time to sort through those memories. Imagine finding all your favorite holiday moments from the last few years with a simple search, ready to be printed on a beautiful Custom Photo Blanket as a truly heartfelt gift. This same approach works for physical pictures, too—check out our guide on what to do with old family photos for more ideas. By taking control of your digital chaos, you're doing more than just organizing files—you're preserving your legacy.
Building Your Digital Darkroom: A Simple Folder Structure
Before you can even think about tagging, editing, or backing up your photos, you need a solid foundation. The most reliable, future-proof way to organize your digital photos is with a simple folder structure that doesn’t depend on any specific app or software. Think of it as building the shelves in your digital library—everything needs a logical place to live, making it easy to find whatever you need, whenever you need it.
The best approach I’ve found over the years is almost always a chronological one. Our brains naturally remember events in the context of time (“that trip was last summer,” “the kids’ first day of school was in September”), which makes a date-based system incredibly intuitive. This method ensures that no matter what computer or program you use a decade from now, your photos will still be perfectly organized and accessible.
This is the simple path from a cluttered camera roll to a neatly organized and enjoyable photo library.
By putting a straightforward system in place, you can transform that digital chaos into a source of genuine joy and connection.
The Year > Month > Event Hierarchy
The core of this system is a simple, nested hierarchy: start with the year, then the month, and finally, a descriptive name for the event. This creates a clear path to any photo you're looking for. You'll have one main folder for each year, and inside that, twelve folders for the months.
This structure works beautifully because it scales. Whether you take a hundred photos a year or ten thousand, the logic stays the same. You're never left wondering where a specific picture might be; you just need to know roughly when it was taken.
For example, a typical structure would look like this:
-
2024
- 01-January
-
02-February
- 2024-02-14 Valentines Day Dinner
-
03-March
- 2024-03-22 Trip to the Zoo
- 2024-03-29 Park Playdate
- ...and so on.
Here's a small but crucial detail: notice the two-digit numbers for the months (01, 02, 03). This forces your computer to sort the folders chronologically instead of alphabetically. Without that leading zero, "10-October" would appear right after "1-January," which is just plain confusing.
Your folder system is the bedrock of your entire photo organization strategy. A simple, consistent chronological structure is easy to maintain and ensures you can always find what you're looking for, even years down the road.
To help you decide what level of detail is right for you, here’s a quick comparison of two popular folder organization methods.
Choosing Your Folder Organization Method
This table compares a simple chronological sorting method with a more detailed, event-based system to help you choose the best fit.
| Feature | Simple Chronological Structure (Year > Month) | Advanced Event-Based Structure (Year > Month > Event Name) |
|---|---|---|
| Best For | Casual photographers or those just starting to organize their collection. | Families, hobbyists, or anyone who wants to quickly find photos from specific events. |
| Ease of Maintenance | Very easy. Just drop photos into the correct month folder. | Requires a bit more effort. You need to create and name a new folder for each event. |
| Searchability | Good. You can narrow down searches to a specific month and year. | Excellent. You can find photos for "Christmas 2023" or "Beach Trip" in seconds. |
| Example Structure | 2024 > 07-July |
2024 > 07-July > 2024-07-04 Fourth of July BBQ |
| Real-World Scenario | "I know the picture was from our trip last summer, probably July or August." | "I need that photo of Grandma at her birthday party in May." |
| Long-Term Viability | Solid. It's a clean, basic system that will always work. | Future-proof. Provides rich context that remains useful for decades. |
Ultimately, the best system is the one you’ll actually use. You can always start with the simple structure and add more detailed event folders later on for the moments that really matter.
Naming Your Event Folders and Files
Once you have your Year and Month folders set, the next level is creating folders for specific events. The key here is to be descriptive but concise. Think about what words you would use to search for these photos in the future.
Good event folder names provide immediate context. Instead of a generic name like "Vacation," use something more specific like "2024-07-15 Beach Trip Florida." Including the full date (YYYY-MM-DD) at the beginning of the folder name is a pro tip that keeps everything sorted perfectly within your monthly folders.
Let's look at some seasonal examples:
-
For Mother's Day: A folder inside
05-Maycould be named2024-05-12 Mothers Day Brunch. -
For the Holidays: A folder inside
12-Decembermight be2023-12-25 Christmas Morningor2023-12-31 New Years Eve Party.
This level of detail makes finding photos for specific projects—like creating a Custom Photo Blanket for an anniversary or holiday—an absolute breeze. You can instantly navigate to the exact folder you need, rather than scrolling through thousands of unorganized images.
The same logic applies to your individual photo files. While renaming every single photo can feel like a lot, it’s incredibly powerful for your most important shots. A simple convention like YYYY-MM-DD_Event-Name_001.jpg makes each photo searchable on its own. For example: 2024-05-12_MothersDayBrunch_001.jpg. Most batch-renaming tools can automate this, saving you hours of manual work and creating a truly robust archive of your most cherished moments.
The Art of Culling: Decluttering Your Photo Collection
Once you’ve got a solid folder system in place, it’s time for the most liberating step of all: tackling the sheer volume of photos. Let's be honest, the biggest hurdle to getting organized is simply having too many pictures. This is where the art of culling—or decluttering—comes in. Think of it as a guilt-free way to make quick, decisive choices about what to keep, what to delete, and what to crown an absolute favorite.
It’s all about curation. You wouldn’t keep every single rough draft of a novel; you’d keep the polished, final version. The same idea applies here. Your goal is to get rid of the duplicates, the blurry shots, and those ten near-identical attempts to capture one perfect smile. This isn't about erasing memories; it’s about making the best ones shine.

Embrace the "Less Is More" Mindset
The first rule of culling is to be ruthless, but not heartless. For each photo, ask yourself a simple question: "Does this picture bring me joy or tell a unique part of the story?" If the answer is no, it’s okay to let it go. Our phones and cameras make it so easy to snap dozens of photos in minutes, which leads to some serious digital bloat.
The explosion of digital content means most personal libraries are filled with redundant images. Some estimates even suggest that 20-40% of the average person's photo collection is just duplicates or near-duplicates. This constant picture-taking is what makes a decluttering process so essential.
Culling your photo collection isn’t about deleting memories. It’s about elevating your best moments so they don't get lost in a sea of digital noise. A smaller, well-curated library is infinitely more valuable and enjoyable than a massive, cluttered one.
A Practical Culling Workflow
To keep from feeling totally overwhelmed, you need a plan. Don't try to sort through your entire archive at once. Instead, tackle it one event folder at a time, starting with your most recent photos and working your way back.
Here’s a simple workflow I use for every folder:
- First Pass for Obvious Deletions: Do a quick scan and immediately delete anything that’s objectively bad. This means photos that are out of focus, way too dark or bright, or where someone’s blinking. Don’t overthink it; just clear out the easy-to-spot duds.
- Second Pass for Duplicates: Now, hunt for those series of near-identical shots. We all do it—taking five photos of the same pose just to be safe. Compare them side-by-side and pick the single best one. Look for the sharpest focus, the biggest smile, or the most genuine expression, and delete the rest without a second thought.
- Third Pass for "Favorites": With the clutter gone, go through the remaining photos one last time. This is your chance to tag or mark your absolute favorites. Most photo apps and operating systems have a "favorite" feature, usually a star or a heart icon. Clicking that little icon creates a pre-filtered collection of your best-of-the-best images.
This final step is a game-changer. When the holidays roll around and you want to create a heartfelt gift like a Custom Photo Blanket featuring the year's best moments, you won't have to dig through hundreds of so-so pictures. You can just filter by your "favorites" and instantly have a gallery of high-quality, meaningful images ready to go. It turns what could be a huge chore into a quick and joyful experience.
Making Your Photos Easy to Find with Tags and AI
You’ve sorted your photos into a neat folder system, which is a huge win. But what if you could find any photo, from any year, in just a few seconds? This is where the real magic happens. We’re moving beyond folders and into the world of smart, searchable memories using tags and a little help from modern tech.
Think about this: every single photo you take has a bunch of information already baked right in. It’s called EXIF data, and your camera or phone records it automatically—things like the exact date and time, the camera settings, and often even the GPS location. This is how your computer knows how to sort pictures by date, but it's really just the beginning.
The game-changer is adding your own context. This is what we call tagging (or keywording), and it's how you tell your photo library what your pictures are actually about.
The Power of a Few Good Tags
Tagging is just adding simple, descriptive keywords to your photos. You don’t need any fancy software for this; the ability is built right into your computer. On a Mac, you can add tags directly in Finder, and on Windows, it’s as simple as editing the "Tags" field in a file's properties.
Just look at a photo and think about what words you’d use to find it later. Who’s in it? What’s going on? Where are you?
For a photo from a family barbecue, your tags could be as simple as:
- Mom
- Grandma
- Birthday
- Cake
- Summer
- Backyard
That’s it. A year from now, when you search your computer for "Mom" and "Birthday," that photo will pop right up, no matter which folder it’s hiding in. You’re essentially building a personal search engine for your own life.
Taking a few minutes to add simple tags turns a static archive into a living, searchable library of your family's history. It’s the difference between digging for a memory and having it at your fingertips.
Let AI Do the Heavy Lifting for You
While manually tagging is great for specifics, a lot of today's photo services have taken searching to a whole new level with artificial intelligence. Platforms like Google Photos and Apple Photos use incredible AI to automatically scan and identify what’s in your pictures. You don't have to lift a finger.
This technology can recognize all sorts of things:
- Faces: It automatically groups photos of the same person, so you can just search by their name.
- Objects: You can type in almost anything— "dog," "car," "sunset," "flowers"—and it will find it.
- Places and Scenes: The AI is smart enough to identify locations like "beach," "mountains," or "city," often with stunning accuracy.
This completely changes how you find your photos. Instead of trying to remember the exact date of that beach trip, you can just search for "Mom at the beach." The system will comb through your entire library and pull up every photo that matches, making it ridiculously easy to find the perfect shots for any project.
This is a lifesaver when you’re looking for a gift. With Mother’s Day around the corner, a quick search can instantly gather dozens of heartwarming moments with Mom. All her best smiles from over the years are suddenly right there, ready to be turned into a thoughtful Custom Photo Blanket. It’s the easiest way to create a truly personal and meaningful present she'll never forget.
The 3-2-1 Backup Plan to Protect Your Memories
All that time you just spent organizing, culling, and tagging your photos? It means absolutely nothing if it all vanishes in a flash. We’ve all heard the horror stories—a single hard drive failure, a stolen laptop, or a software bug can wipe out years of irreplaceable memories in an instant.
This is exactly why a rock-solid backup strategy isn’t just a “nice-to-have.” It’s non-negotiable if you want to protect your family’s history.
The gold standard for keeping your data safe, used by professional photographers and tech-savvy families alike, is the 3-2-1 backup strategy. It might sound a little technical, but the idea is actually incredibly simple and powerful. Think of it as a multi-layered defense system that ensures your photos are safe from just about any disaster you can imagine.
So, What's the 3-2-1 Rule?
The 3-2-1 strategy is really just a simple framework to build a resilient backup system for your photos. Its entire purpose is to eliminate any single point of failure, meaning no single event can destroy every copy of your pictures.
Here’s the breakdown:
- Three Copies: You need to have a total of three copies of your photo library. This includes your main "working" copy plus two separate backups.
- Two Different Media: These three copies must live on at least two different types of storage media. You can’t just have three folders on the same hard drive—that doesn’t count! You need physical separation, like your computer’s internal drive and an external hard drive.
- One Off-Site Copy: Finally, at least one of those copies must be stored in a completely different physical location. This is your ultimate trump card against local disasters like a fire, flood, or theft.
Think of it this way: your computer is your daily photo album. The external hard drive is the copy you keep in a fireproof safe at home. The cloud backup is your family's history, safely tucked away in another city. If one fails, you always have the others to fall back on.
A Practical Backup Setup for Your Photos
Putting the 3-2-1 rule into practice is much easier than it sounds. You don’t need a complex server room or a ton of expensive gear. For a deeper look at securing all your digital files, not just photos, this guide on how to backup computer files is a fantastic resource.
Here’s a real-world example of how this looks:
-
Copy 1 (Primary): Your Computer's Hard Drive. This is your main library, the one you’re actively organizing. It lives right on your laptop or desktop, ready for you to access anytime.
-
Copy 2 (Local Backup): An External Hard Drive. Go out and buy a reliable external hard drive and dedicate it solely to backing up your photos. Once a month (or more often!), just connect it and drag your entire photo library over. When you’re done, unplug it. This keeps it safe from power surges or ransomware.
-
Copy 3 (Off-Site Backup): A Cloud Storage Service. This is your crucial off-site copy. With the massive growth in digital photography, cloud storage is essential. Popular services make automatic, continuous backups almost effortless.
This layered approach is how you make all your photo organization efforts truly permanent. It gives you peace of mind, knowing that no matter what happens—a coffee spill on your laptop or something far worse—your memories are safe. And that peace of mind is priceless, especially when you’re gathering those precious holiday moments that will one day make the perfect Custom Photo Blanket.
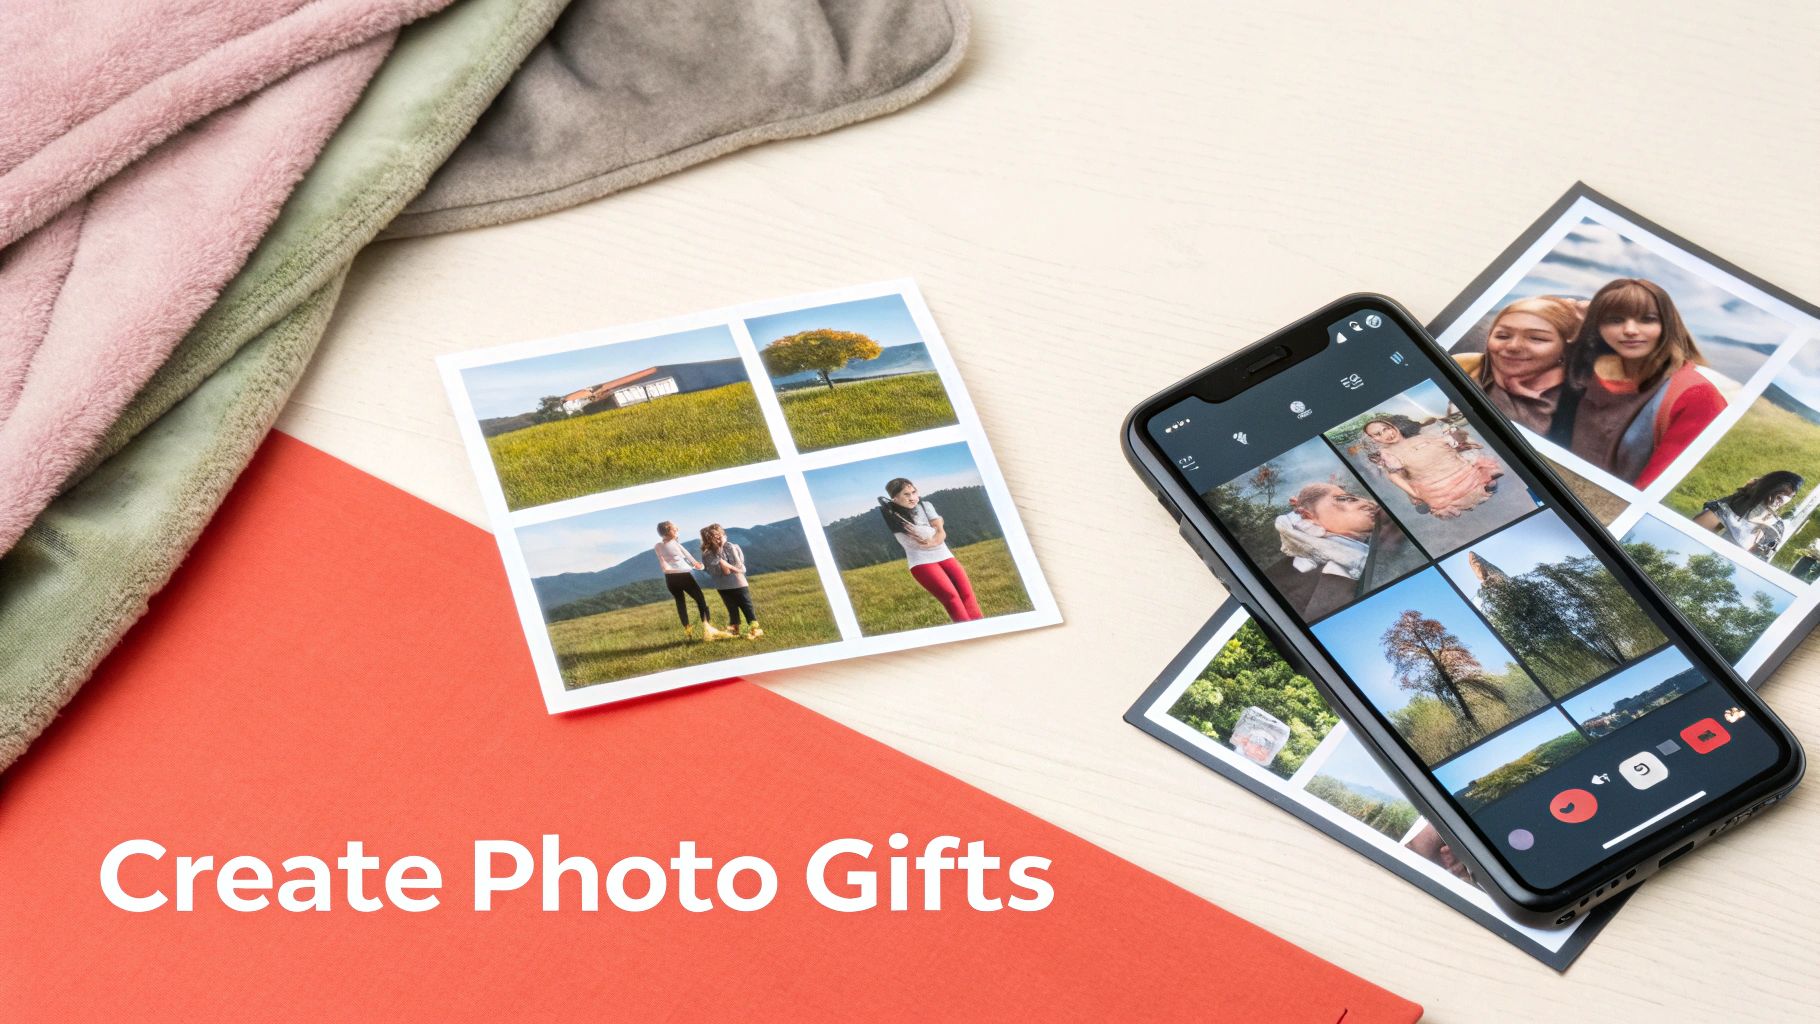
From Digital Files to Cherished Gifts
So, you’ve put in the work. You’ve wrangled years of digital chaos into a beautifully organized photo library. Now for the fun part: bringing those memories back into the real world. A sorted collection is the perfect launchpad for creating tangible keepsakes that tell your family’s story, transforming pixels on a screen into something you can actually hold.
Before you hit “print,” a couple of quick checks can make a huge difference in the final product. Don’t worry, you don’t need to be a photo pro. The two main things to keep an eye on are resolution and aspect ratio.
Prepping Your Photos for Printing
Think of resolution as the amount of detail packed into your image. More detail means a sharper, clearer print. The good news? Photos taken with any modern smartphone or digital camera are almost always high-quality enough for standard prints. Most printing services will even give you a heads-up if the resolution is too low for the size you’ve selected.
Aspect ratio is just the photo’s shape—is it a square, a wide landscape, or a tall portrait? Just be mindful of how that shape will fit onto the gift you’re designing. A beautiful wide sunset photo, for instance, might get awkwardly cropped to fit on a square pillow.
Here’s a quick checklist to run through before sending a photo off to be printed:
- Resolution Check: Does the image still look sharp and clear when you zoom in a little?
- Simple Edit: Can you give the brightness or contrast a small boost to make the colors pop?
- Crop for Impact: Is there any distracting background you can cut out to focus on the good stuff?
- Consider the Product: How will the photo’s orientation and colors look on the final item?
The goal here isn’t perfection. It’s about making small, easy tweaks that ensure the final printed gift looks just as vibrant and beautiful as the memory itself.
Creating the Perfect Custom Photo Blanket
With your best photos prepped and ready to go, you can start designing a gift that’s genuinely unforgettable. A custom photo blanket is such a wonderful way to wrap someone you love in your favorite shared moments. And since you’ve already done the hard work of organizing, finding the perfect theme is a breeze.
For the holidays, a “Year in Review” blanket is a fantastic gift for grandparents, filled with the best moments from the past 12 months. For Mother’s Day, you could create a beautiful collage of multi-generational photos featuring grandmothers, mothers, and daughters. These kinds of thoughtful, curated gifts are only possible when your photos are organized and easy to find.
If you’re looking for more detailed guidance, our tutorial on how to design a blanket with photos walks you through the entire creative process. And now that your digital life is in order, you can explore other top DIY photo gift ideas to create heartfelt presents for any occasion.
Common Questions About Organizing Digital Photos
Even with a solid plan, a few questions always pop up when you start learning how to organize digital photos. It's a journey, and a few common hurdles can feel tricky at first. Here are some straightforward answers to the questions we hear most often, designed to keep you feeling confident and moving forward.
What Is the Best Software for Organizing Digital Photos
This is easily the question I get asked the most, and my answer surprises people: there’s no single "best" program for everyone. The smartest, most future-proof strategy is actually a hybrid approach that uses the strengths of the tools you probably already have.
Your foundation should always be your computer's own file system—that’s Finder on a Mac or File Explorer on Windows. By using the simple Year > Month > Event folder structure we talked about, you create a library that's universal. It doesn’t depend on any single app or company, ensuring your hard work will last for decades.
Once that structure is in place, then you can layer on a cloud service like Google Photos or Apple Photos. These are brilliant for their powerful search features, easy sharing, and automatic backups. Think of them as a smart, accessible copy of the files you've already perfectly organized locally.
How Often Should I Organize My New Photos
Consistency is so much more important than intensity. The goal here is to avoid that dreaded once-a-year marathon session where you’re staring down a mountain of thousands of unsorted pictures. The key is to build a simple, repeatable habit that doesn't feel like a chore.
Try setting aside just 20-30 minutes at the end of each month. Use that small chunk of time to import that month’s photos from your phone or camera, do a quick pass to delete the blurry or duplicate shots, rename the keepers, and file them away.
For bigger events, like a vacation or a holiday, I always try to tackle those photos within a week of getting home. The details are still fresh, which makes it way faster to name events and tag people. This "little and often" approach makes the whole process feel completely manageable.
Staying organized isn't about one massive, overwhelming project. It's about building a small, consistent habit that prevents the digital clutter from ever building up again.
Is It Safe to Only Store My Photos in the Cloud
While cloud services are incredibly convenient, relying on one as your only copy is a huge risk. Companies can change their policies, accounts can get compromised or accidentally deleted, and in rare cases, a service can shut down completely.
There's a reason the industry gold standard for safety is the 3-2-1 backup rule. You should always have:
- 3 total copies of your photo library.
- On 2 different types of media (like your computer's hard drive and an external hard drive).
- With at least 1 copy stored off-site.
Your cloud service is the perfect off-site copy! But it needs to be backed up by local copies that you control directly. If you have questions about our own policies and how we handle data, you can always check out our frequently asked questions page.
How Do I Handle Decades of Old Unorganized Photos
Looking at a ten or twenty-year backlog of unorganized photos can feel paralyzing. I've been there. The secret is to not even try to tackle it all at once. The best approach is to "start fresh, then go back."
First, get your new system up and running for the current year moving forward. Once you're in the groove with your monthly organizing habit, then you can start chipping away at the past. Dedicate one weekend a month to organizing just a single past year. This method builds momentum and keeps you from getting discouraged by the sheer size of the task, making the whole project feel achievable.
Ready to turn your beautifully organized photos into something truly special? At That Blanket Co, we help you transform your favorite memories into cozy, high-quality custom photo blankets that tell your family's story. With gallery-quality printing and ultra-soft, machine-washable fabric, you can create a cherished keepsake that lasts a lifetime.